Featured
How To Put On Your Race Bib
Modified: October 24, 2023
Discover how to attach your marathon bib with our featured guide. Follow our step-by-step instructions for a hassle-free race day experience.
Introduction
Attaching your marathon bib is an important step to ensure a smooth and successful race day. Your bib not only displays your race number but also serves as your identification and timing device. Properly attaching your bib is crucial to avoid it falling off or becoming a distraction during the race.
In this article, we will guide you through the process of attaching your marathon bib to your shirt or race outfit. Whether you are a seasoned runner or participating in your first marathon, these steps will help you secure your bib confidently and comfortably.
Before we dive into the specific steps, let’s go over the materials you will need to attach your bib:
- Safety pins or a race belt
- Your marathon bib
- A shirt or race outfit
With these materials ready, let’s get started on attaching your marathon bib and getting race-day ready!
Materials Needed
Before you begin attaching your marathon bib, it’s important to gather the necessary materials. By having everything you need in advance, you can ensure a seamless and efficient bib attachment process. Here are the materials you will need:
- Safety pins: Safety pins are the traditional method of attaching a marathon bib. They are small, lightweight, and easily accessible. It’s recommended to have at least four safety pins to securely fasten your bib to your shirt or race outfit.
- Race belt: Another option for attaching your bib is a race belt. This elastic belt is designed to hold your bib securely in place without the need for safety pins. It can be a convenient alternative, especially for those who prefer not to poke holes in their clothing.
- Marathon bib: Of course, you’ll need your marathon bib itself. This is typically provided to you during the race packet pickup. Ensure that your bib is unfolded and ready for attachment before you begin the process.
- Shirt or race outfit: You will attach your bib to your shirt or race outfit, so make sure you have your chosen garment ready. It’s best to select a lightweight, moisture-wicking fabric that will be comfortable to wear during the race.
Before you proceed, take a moment to gather these materials in a well-lit and comfortable space. Having everything within reach will make the bib attachment process smoother and more efficient.
Now that you have all the necessary materials, let’s move on to the step-by-step process of attaching your marathon bib.
Step 1: Gather Your Bib and Supplies
The first step in attaching your marathon bib is to gather all your bib and supplies in one place. This will ensure that you have everything you need within reach and can start the attachment process smoothly. Here’s what you need to do:
- Find a quiet and well-lit area: Look for a space where you can lay out your bib and supplies without any distractions. A well-lit area will make it easier to see the small details while attaching the bib.
- Lay out your bib: Carefully unfold your marathon bib and lay it flat on a clean surface. Smooth out any wrinkles or creases to ensure that it lays flat when attached to your shirt or race outfit.
- Gather safety pins or a race belt: Depending on your preferred method of attachment, collect the appropriate supplies. If you choose to use safety pins, make sure to have at least four pins available. If you opt for a race belt, ensure that it is in good condition and ready to be used.
- Prepare your shirt or race outfit: Take out the shirt or race outfit you plan on wearing for the marathon. Make sure it is clean and free of wrinkles. Lay it flat in front of you so that it’s ready for the bib attachment.
- Double-check your supplies: Before you proceed, quickly review your supplies to ensure you have everything you need. Confirm that you have the correct number of safety pins or that your race belt is in good working condition.
Once you have gathered your bib and supplies and double-checked everything, you’re ready to move on to the next step. Planning and being organized in this initial stage will set you up for a smoother and hassle-free bib attachment process.
Step 2: Locate the Four Corners of Your Bib
Now that you have gathered your marathon bib and supplies, it’s time to locate the four corners of your bib. This step is important to ensure that your bib is properly positioned and securely attached without any folds or creases. Here’s what you need to do:
- Hold your marathon bib with both hands: Carefully pick up your unfolded bib and hold it with both hands, ensuring that it is facing the correct way up. Take a moment to familiarize yourself with the design and layout of the bib.
- Identify the top two corners: The top corners of the bib are usually marked with either a small hole or reinforced edges. These corners are where you will be attaching your safety pins or race belt, so it’s important to identify them accurately.
- Locate the bottom two corners: While holding the top corners, gently lower the bib and locate the bottom two corners. These corners are opposite to the top corners and will also be used for attachment.
- Ensure there are no folds or wrinkles: As you locate the corners, make sure that the bib is completely flat and free of any folds or wrinkles. Smooth out any creases to ensure a clean and secure attachment.
- Double-check the orientation: Before proceeding to the next step, double-check that the bib is facing the correct way up. The race number and any sponsor logos or additional information should be easily readable when the bib is attached.
By locating the four corners of your bib, you will have a clear understanding of where the attachment points will be. This will help you position the bib accurately on your shirt or race outfit in the next step. Take a moment to ensure that the corners are properly identified and that the bib is in the correct orientation before moving on to the next step.
Step 3: Attach the Bib to Your Shirt or Race Outfit
With the four corners of your marathon bib located, it’s time to attach the bib to your shirt or race outfit. This step requires precision and care to ensure that the bib is securely fastened without causing any damage to your clothing. Here’s how to proceed:
- Choose your preferred method of attachment: Decide whether you will be using safety pins or a race belt to attach your bib. Both methods are effective, so choose the one that you are most comfortable with.
- Position your shirt or race outfit: Put on your shirt or race outfit and position it in front of you, making sure it is smooth and free of wrinkles. The area where you plan on attaching the bib should be easily accessible and flat.
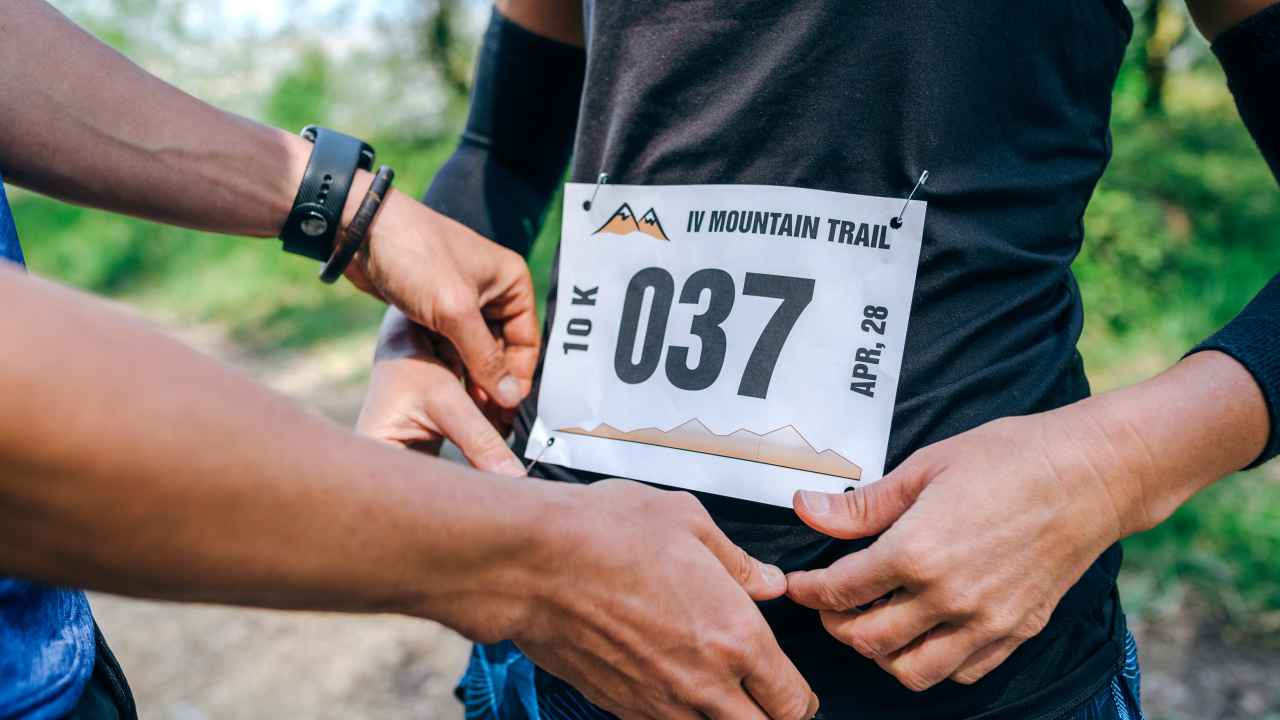
- Attach the top two corners: If you are using safety pins, place a pin through the top left corner of the bib. Gently lift a small portion of your shirt or race outfit and secure the pin, ensuring that it goes through both the bib and the fabric. Repeat the process for the top right corner. If you are using a race belt, slide the corners of the bib into the designated slots on the belt.
- Attach the bottom two corners: Using the same method as above, attach the bottom two corners of the bib to your shirt or race outfit. This will help keep the bib secure and prevent it from flapping or moving during your run.
- Smooth out any wrinkles or folds: Once all four corners are securely attached, take a moment to smooth out any wrinkles or folds on the bib. This will ensure that the bib lays flat against your shirt or race outfit, minimizing any discomfort during the race.
Take your time during this step to ensure that the bib is properly attached. Check that the pins or race belt are going through both the bib and the fabric without causing any tears or damage. Smooth out the bib to make sure it is secure and comfortable against your shirt or race outfit.
Now that the bib is attached, you’re ready to move on to the next step—adjusting the bib position.
Step 4: Adjust the Bib Position
After attaching the marathon bib to your shirt or race outfit, it’s important to take a moment to adjust the bib’s position. Properly positioning the bib ensures that it is visible, comfortable, and doesn’t interfere with your movement during the race. Follow these steps to adjust the bib position:
- Stand in front of a mirror: Find a mirror or ask someone to assist you in checking the position of your bib. Standing in front of a mirror allows you to see how the bib looks and ensure it is well-aligned.
- Center the bib: Make sure the bib is centered on your chest or stomach. It should be positioned in a way that makes it easily readable to race officials and photographers. Adjust the bib’s placement as needed so that it is symmetrical and visible.
- Avoid overlapping clothing: Ensure that no part of your shirt or race outfit is covering the numbers or important information on the bib. Adjust the fabric around the bib to avoid any overlapping that may hinder its visibility.
- Check for comfort: Move around a bit and see if the bib feels comfortable in its position. If it feels too tight or restricts your movement, make small adjustments until you find a comfortable fit.
- Secure any loose fabric: If your shirt or race outfit has excess fabric that may flap or move during your run, secure it with additional pins or tuck it in to ensure it doesn’t interfere with the bib.
By taking the time to adjust the position of your marathon bib, you will have a clean and professional look. It will also ensure that race officials and photographers can easily identify you during the event.
Once you are satisfied with the position and comfort of the bib, it’s time to move on to the next step—using safety pins or a race belt to secure the bib further.
Step 5: Use Safety Pins or Race Belt
Now that your marathon bib is securely attached and properly positioned, it’s time to further secure it using safety pins or a race belt. This step ensures that the bib stays in place throughout your race, providing you with a hassle-free running experience. Follow these instructions based on your chosen method:
Using Safety Pins:
- Take out additional safety pins: If you only used four safety pins to attach the corners of your bib, take out a few more pins to provide additional support for the sides and middle of the bib.
- Pin the sides of the bib: Starting from the top corner, carefully lift a small portion of the bib and secure it with a safety pin. Repeat this process for the opposite side, ensuring that the pin goes through both the bib and the fabric of your shirt or race outfit.
- Pinning the middle of the bib (optional): If you prefer extra stability and to prevent any sagging or flapping of the bib, you can insert one or two pins in the middle. Place the pins in strategic spots that won’t interfere with your comfort or movement during the race.
Using a Race Belt:
- Slide the bib onto the race belt: If you are using a race belt, slide the corners of the bib into the designated slots on the belt. Adjust the belt to ensure that the bib is securely held in place and is easily visible.
- Secure the race belt around your waist: Put on the race belt and adjust it to fit comfortably around your waist. Make sure it is not too loose or too tight, allowing for easy movement during the race.
Whichever method you choose, ensure that the bib is securely fastened without causing any discomfort or restriction. Double-check that the pins are going through both the bib and your shirt or race outfit, or that the race belt is holding the bib snugly in place.
Now that your marathon bib is firmly attached using safety pins or a race belt, it’s time to move on to the next step—double-checking your bib attachment.
Step 6: Double Check Your Bib Attachment
With your marathon bib fully attached using safety pins or a race belt, it’s crucial to double-check the attachment to ensure it is secure and properly positioned. This final review gives you peace of mind knowing that your bib will stay in place during the race. Follow these steps to double-check your bib attachment:
- Inspect the corners: Take a close look at each corner of the bib to ensure that the safety pins or race belt are securely holding it in place. Check for any signs of looseness or movement that may indicate the need for adjustment.
- Tug gently on the bib: Give the bib a gentle tug to test its stability. It should remain firmly attached without any signs of slipping or coming loose. If you notice any movement, make necessary adjustments to secure it further.
- Confirm visibility and comfort: Stand in front of a mirror or ask someone to check if the race number and any valuable information on the bib are visible and readable. Also, assess if the bib feels comfortable and doesn’t cause any irritation or discomfort against your shirt or race outfit.
- If using safety pins, check for sharp edges: Carefully run your fingers along the safety pins to ensure there are no exposed sharp edges that could potentially poke or scratch your skin during the race. If you find any, cover them or replace the pin with a new one.
- Adjust if needed: If you notice any issues during your double-check, such as a loose corner or an uncomfortable fit, make the necessary adjustments. This may involve repositioning a safety pin or tightening the race belt.
By double-checking your bib attachment, you can have confidence that it will remain secure and intact throughout your race. This attention to detail ensures that you can focus on your performance without any distractions or worries about your bib coming loose.
Once you have completed this step, you’re now prepared for race day. Take a moment to review any tips or reminders specific to race day in the next section.
Step 7: Tips for Race Day
As you prepare for race day, there are a few important tips and reminders to keep in mind regarding your marathon bib. These tips will help ensure a smooth and enjoyable race experience:
- Don’t remove or alter your bib: Once you have securely attached your bib, it’s important not to remove or alter it in any way. Removing or tampering with the bib can result in disqualification or inaccurate race timing.
- Protect your bib from water or sweat: If there’s a chance of rain or if you anticipate sweating during the race, consider using a waterproof bib cover or applying a clear adhesive protective sheet to keep your bib dry and legible.
- Avoid covering the bib during photos: When taking race-day photos, ensure that your bib is visible and not covered by accessories such as jackets or water bottles. This will allow for clear identification in official race photos.
- Remove any loose accessories: Before the race begins, double-check that there are no loose accessories, such as scarves or extra layers hanging over your bib. These can interfere with the visibility of your bib and may even pose a safety risk.
- Place your bib on the front: Always wear your bib on the front of your shirt or race outfit. This makes it easier for race officials and volunteers to identify you and record your race time accurately.
- Follow race guidelines: Familiarize yourself with the specific guidelines and instructions provided by the race organizers regarding bib placement and attachment. Adhering to these rules ensures a fair and smooth race for all participants.
- Take care of your bib after the race: Once the race is over, you may want to keep your bib as a memorable token. If you plan on keeping it, gently remove the safety pins, clean any adhesive residue if necessary, and store it in a safe place along with other race memorabilia.
These tips will help you make the most of your marathon bib on race day. By following these guidelines, you can ensure that your bib remains securely attached and that your race experience is free from any bib-related issues.
Now that you’re equipped with these helpful tips, enjoy your race and have a fantastic experience!
Conclusion
Attaching your marathon bib is a critical part of race preparation. By following these step-by-step instructions, you can confidently attach your bib to your shirt or race outfit, ensuring that it remains securely in place throughout your race.
First, gather all the materials you need, including safety pins or a race belt, your marathon bib, and your shirt or race outfit. Then, locate the four corners of your bib and ensure there are no folds or wrinkles. Attach the bib to your shirt or race outfit by using safety pins or a race belt, making sure it is centered and flat.
After attaching the bib, take a moment to adjust its position, double-checking its visibility and comfort. To further secure your bib, use additional safety pins or tighten the race belt. Finally, double-check your bib attachment for stability and make any necessary adjustments.
Remember to follow any race day guidelines regarding your bib and avoid covering it during photos. Take care of your bib after the race, and enjoy the experience and memories it represents.
Now that you are equipped with the knowledge on how to properly attach your marathon bib, you can focus on your race and enjoy the exhilaration of reaching the finish line. Good luck!