Featured
How To Install Old Triathlon Seat Posts
Modified: January 2, 2024
Learn how to install old triathlon seat posts with our featured guide. Step-by-step instructions and helpful tips for a smooth installation process.
Introduction
Welcome to our guide on how to install old triathlon seat posts! Whether you’re a seasoned triathlete looking to upgrade your bike or a beginner trying to customize your ride, installing a new seat post can make a world of difference in your cycling experience.
The seat post of a triathlon bike plays a crucial role in optimizing your riding position, providing comfort, and maximizing power transfer. However, it’s not uncommon for triathletes to find themselves with an older model bike and a desire to replace the seat post with a newer, more advanced one. That’s where this guide comes in handy!
In this article, we will walk you through the step-by-step process of installing an old triathlon seat post. From gathering the necessary tools and materials to making final adjustments, we’ve got you covered. So let’s dive in and get ready to give your bike a much-needed upgrade!
Before we begin, it’s important to note that while we will provide general instructions in this guide, it’s always a good idea to refer to the manufacturer’s guidelines specific to your seat post and bike model. Additionally, if you’re unsure or uncomfortable with any step of the installation process, it’s best to consult a professional bike mechanic to ensure everything is done correctly and safely.
Now, let’s gather our tools and materials and get ready to install that new triathlon seat post!
Step 1: Gather the Necessary Tools and Materials
Before getting started with the installation process, it’s important to gather all the tools and materials you will need. Having everything prepared beforehand will ensure a smooth and efficient installation. Here are the essential tools and materials you’ll need:
- Allen wrench set: Triathlon seat posts commonly use bolts that require an Allen wrench for removal and installation. Make sure you have a set of Allen wrenches in various sizes to accommodate different bolt sizes.
- Grease: Applying grease to the seat post and seat tube helps protect against corrosion and allows for easier adjustment in the future. Use a high-quality bike grease for the best results.
- Torque wrench: A torque wrench is essential to ensure that you tighten the bolts to the manufacturer’s recommended torque specifications. This helps prevent over-tightening or under-tightening, which can lead to damage or slippage.
- Measuring tape: If you’re trying to achieve a specific saddle height, a measuring tape will come in handy to ensure accuracy.
- Clean cloth: Having a clean cloth nearby will allow you to wipe away any excess grease or dirt during the installation process, keeping your workspace tidy.
It’s always a good idea to double-check with the specific seat post manufacturer’s guidelines to see if there are any additional tools or materials required for your particular seat post model. Once you have gathered all the necessary tools and materials, you’re ready to move on to the next step!
Step 2: Remove the Current Seat Post
Now that you have gathered all the necessary tools and materials, it’s time to remove the current seat post from your triathlon bike. Follow these steps:
- Loosen the seat clamp: Locate the seat clamp bolt or quick-release lever near the top of the seat post. Use the appropriate tool, typically an Allen wrench, to loosen the bolt or release the lever. This will allow you to adjust the height and angle of the seat.
- Lower the seat post: Carefully lower the seat post by pulling it out of the seat tube. Be mindful of any cables or wires that may be attached to the seat post or running through the bike frame.
- Inspect for additional bolts: Some triathlon bikes may have additional bolts or clamps securing the seat post in place. Inspect the area near the bottom bracket or seat tube for any other bolts that need to be loosened or removed before fully taking out the seat post.
- Remove the seat post: Once all necessary bolts have been loosened or removed, gently slide the seat post out of the seat tube. If the seat post seems stuck, try twisting it slightly while pulling upwards to help release it from any residual dirt or debris.
As you remove the current seat post, take note of its position and any markings that indicate the height or angle at which it was set. This will help you set up the new seat post to a similar position, ensuring a comfortable and familiar riding experience.
With the old seat post successfully removed, you’re now ready to move on to the next step: preparing the new triathlon seat post!
Step 3: Prepare the New Triathlon Seat Post
With the old seat post removed, it’s time to prepare the new triathlon seat post for installation. Follow these steps:
- Clean the seat tube: Use a clean cloth to wipe down the inside of the seat tube to remove any dirt, grease, or debris. This will ensure a clean and secure fit for the new seat post.
- Apply grease: Apply a thin layer of grease to the part of the seat post that will be inserted into the seat tube. This will help prevent corrosion and make any future adjustments or removal easier. Be sure to spread the grease evenly and wipe off any excess.
- Check the fit: Test the fit of the new seat post by inserting it into the seat tube. It should slide in smoothly but with a snug fit. Avoid using excessive force to prevent damaging the seat post or seat tube. If the seat post doesn’t fit properly, double-check for any obstructions or debris and clean the seat tube again if necessary.
- Measure the desired saddle height: Use a measuring tape to measure the desired saddle height from the center of the bottom bracket to the center of the saddle rails. Take note of this measurement for later reference.
- Adjust the saddle angle: If needed, adjust the angle of the saddle on the new seat post. Most triathlon seat posts allow for easy adjustment by loosening a bolt or quick-release lever and repositioning the saddle to the desired angle. Make sure the saddle is level and comfortable before proceeding to the next step.
By properly preparing the new triathlon seat post, you’ll ensure a secure and comfortable fit when it’s time to install it. Take your time with this step to ensure everything is in order before moving on.
With the new seat post prepared, we’re ready to move on to the next step: installing the new triathlon seat post!
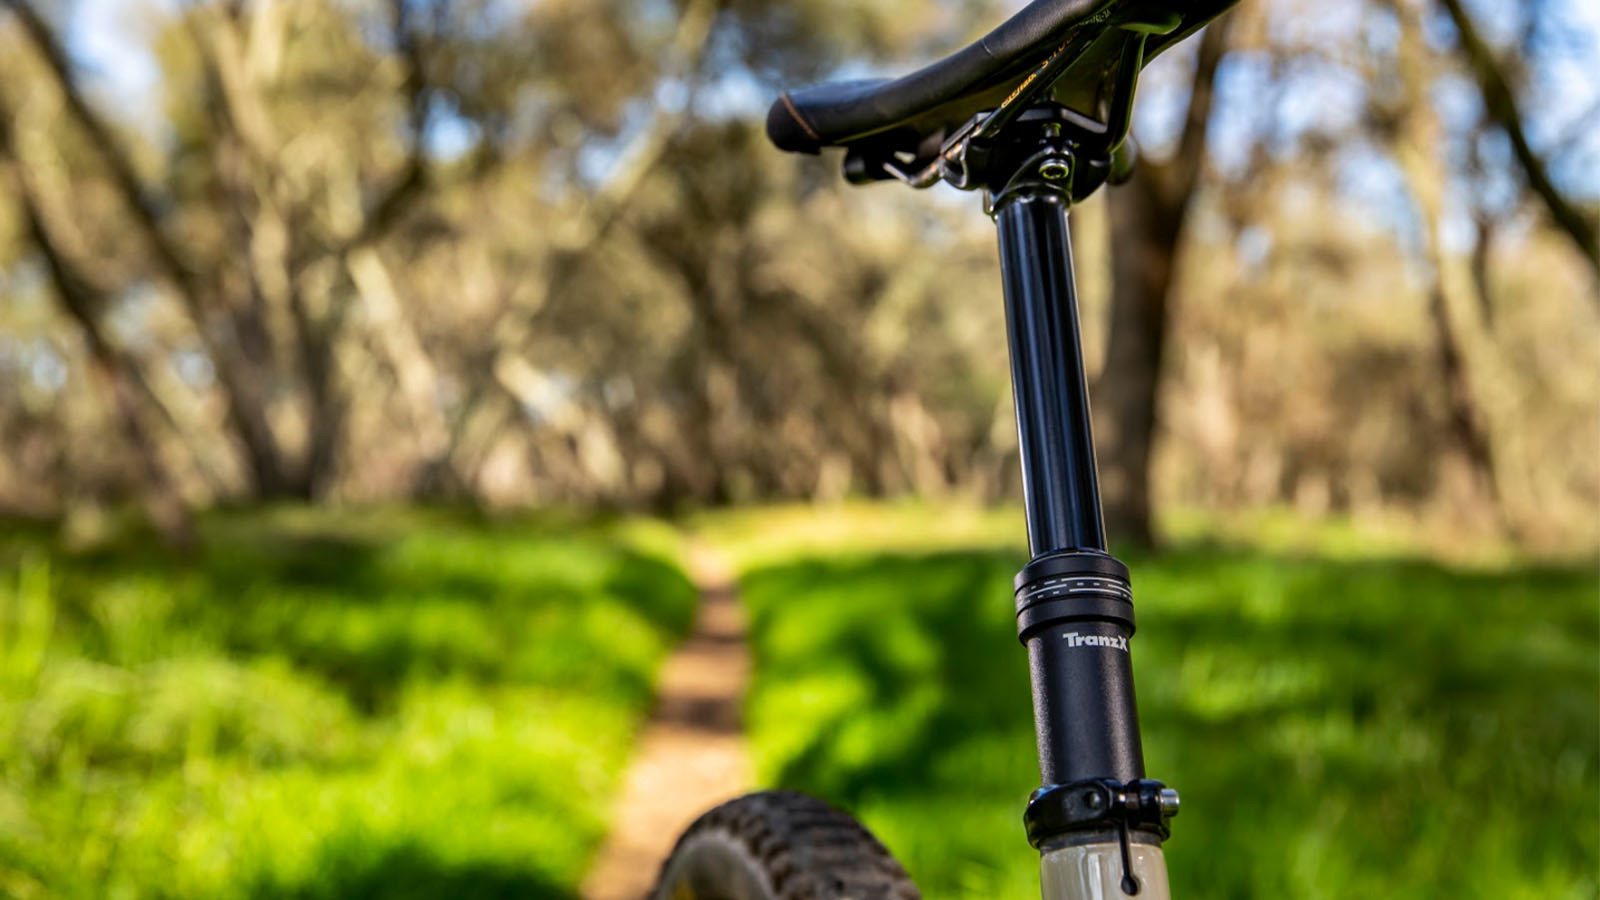
Step 4: Install the New Triathlon Seat Post
Now that you have prepared the new triathlon seat post, it’s time to install it onto your bike. Follow these steps:
- Insert the seat post: Carefully insert the greased end of the new seat post into the seat tube. Make sure it is aligned properly and slides in smoothly. If necessary, twist the seat post slightly as you insert it to help it glide into place.
- Tighten the seat clamp: Once the seat post is fully inserted into the seat tube, tighten the seat clamp bolt or secure the quick-release lever. Use a torque wrench to tighten the bolt to the manufacturer’s recommended torque specification. This will ensure a secure and safe hold on the seat post.
- Check the saddle height: Measure the saddle height from the center of the bottom bracket to the center of the saddle rails, as noted earlier. Adjust the height by raising or lowering the seat post within the seat tube. Use the measurements as a guide to achieve the desired saddle height. Make sure to tighten the seat clamp bolt securely after making any adjustments.
- Check the saddle angle: Double-check the saddle angle and make any final adjustments if needed. Ensure that the saddle is level and comfortable for your riding style and preferences.
- Secure any additional bolts: If your triathlon bike has additional bolts or clamps to secure the seat post, make sure to tighten them securely according to the manufacturer’s specifications. This will prevent any unwanted movement or slippage during your rides.
Once the new triathlon seat post is securely installed and adjusted to your desired height and angle, give it a final check to ensure everything is tight and in place. Shake the bike gently and test for any movement or instability in the seat post or saddle. If everything feels secure, you’re ready to move on to the final step: making any necessary final adjustments.
Congratulations! You’ve successfully installed the new triathlon seat post and are one step closer to a more comfortable and efficient cycling experience!
Step 5: Make Final Adjustments
After installing the new triathlon seat post, it’s important to make any final adjustments to ensure optimal comfort and performance. Follow these steps:
- Test your saddle position: Hop on your bike and take it for a short test ride. Pay attention to how your body feels in relation to the saddle position. Make adjustments as necessary to fine-tune the position for maximum comfort and efficiency. You may need to raise or lower the saddle slightly, or adjust the tilt to find the sweet spot.
- Check saddle angle: While riding, pay attention to the angle of your saddle. It should be level or slightly tilted forward, depending on your preference. If you notice any discomfort or sliding forward or backward while riding, make small adjustments to the saddle angle until it feels just right.
- Check for stability: As you ride, take note of any wobbling or instability in the seat post. If you feel any unwanted movement or flexing, double-check that all bolts and clamps are securely tightened. If the issue persists, consider consulting a professional bike mechanic to ensure proper installation and stability.
- Take note of your riding experience: After making adjustments, pay attention to how your body feels during longer rides. Take note of any discomfort, numbness, or pain and make further adjustments if necessary. It may take some trial and error to find the perfect saddle position, so be patient and keep fine-tuning until you find what works best for you.
- Regularly inspect and maintain: Once you have achieved the ideal saddle position, it’s important to regularly inspect and maintain your triathlon seat post. Check for any signs of wear or damage and clean and lubricate it as needed. This will help prolong its lifespan and ensure optimal performance over time.
By making these final adjustments, you’ll be able to enjoy a comfortable and customized triathlon biking experience. Remember that everyone’s body is different, so what works for others may not work for you. Pay attention to your own comfort and listen to your body’s feedback to find the best fit.
With the new triathlon seat post installed, adjusted, and fine-tuned to perfection, you’re now ready to hit the road and enjoy the benefits of your upgraded ride!
Conclusion
Congratulations on successfully installing your new triathlon seat post! By following the steps outlined in this guide, you’ve taken an important step towards improving your cycling experience. The process of removing the old seat post, preparing and installing the new one, and making final adjustments ensures a comfortable and customized fit for your triathlon bike.
Remember to always refer to the manufacturer’s guidelines specific to your seat post and bike model, and consult a professional bike mechanic if you’re unsure or uncomfortable with any step of the installation process.
With your new seat post in place, you can look forward to enhanced comfort, better power transfer, and improved performance during your triathlon races or training sessions. Make sure to regularly inspect and maintain your seat post to ensure its longevity and optimal performance over time.
Enjoy the ride and continue pushing your triathlon goals with the added advantage of a well-fitted and high-performance seat post. Your improved cycling experience will contribute to your overall enjoyment and success in the sport.
Thank you for choosing our guide and happy triathlon adventures ahead!