Home>Misc>Featured>What Is The Correct Position Of The Hands During The Standing Hammer Curl Exercise?

Featured
What Is The Correct Position Of The Hands During The Standing Hammer Curl Exercise?
Published: October 1, 2023
Discover the correct hand position for the standing hammer curl exercise in this informative article. Get featured tips and maximize your arm workout effectiveness!
Introduction
When it comes to weightlifting and strength training, proper form and technique are crucial for maximizing results and preventing injuries. One exercise that often gets overlooked but is highly effective is the standing hammer curl. This exercise targets the biceps, brachialis, and forearms, helping to build strength and definition in these muscle groups.
However, performing the standing hammer curl correctly requires more than just lifting the weights up and down. It also involves maintaining the correct hand position throughout the movement. The positioning of the hands is often overlooked, but it plays a critical role in targeting the desired muscle groups and avoiding unnecessary strain.
In this article, we will delve into the importance of maintaining the correct hand position during the standing hammer curl exercise. We will explore the different hand positions to avoid and provide step-by-step instructions on how to achieve the optimal hand position for maximum effectiveness.
Whether you are a beginner or a seasoned lifter, understanding and implementing the proper hand position during the standing hammer curl is crucial for achieving the desired results. So let’s dive in and discover the correct way to position your hands for this exercise, ultimately helping you get the most out of your workout routine.
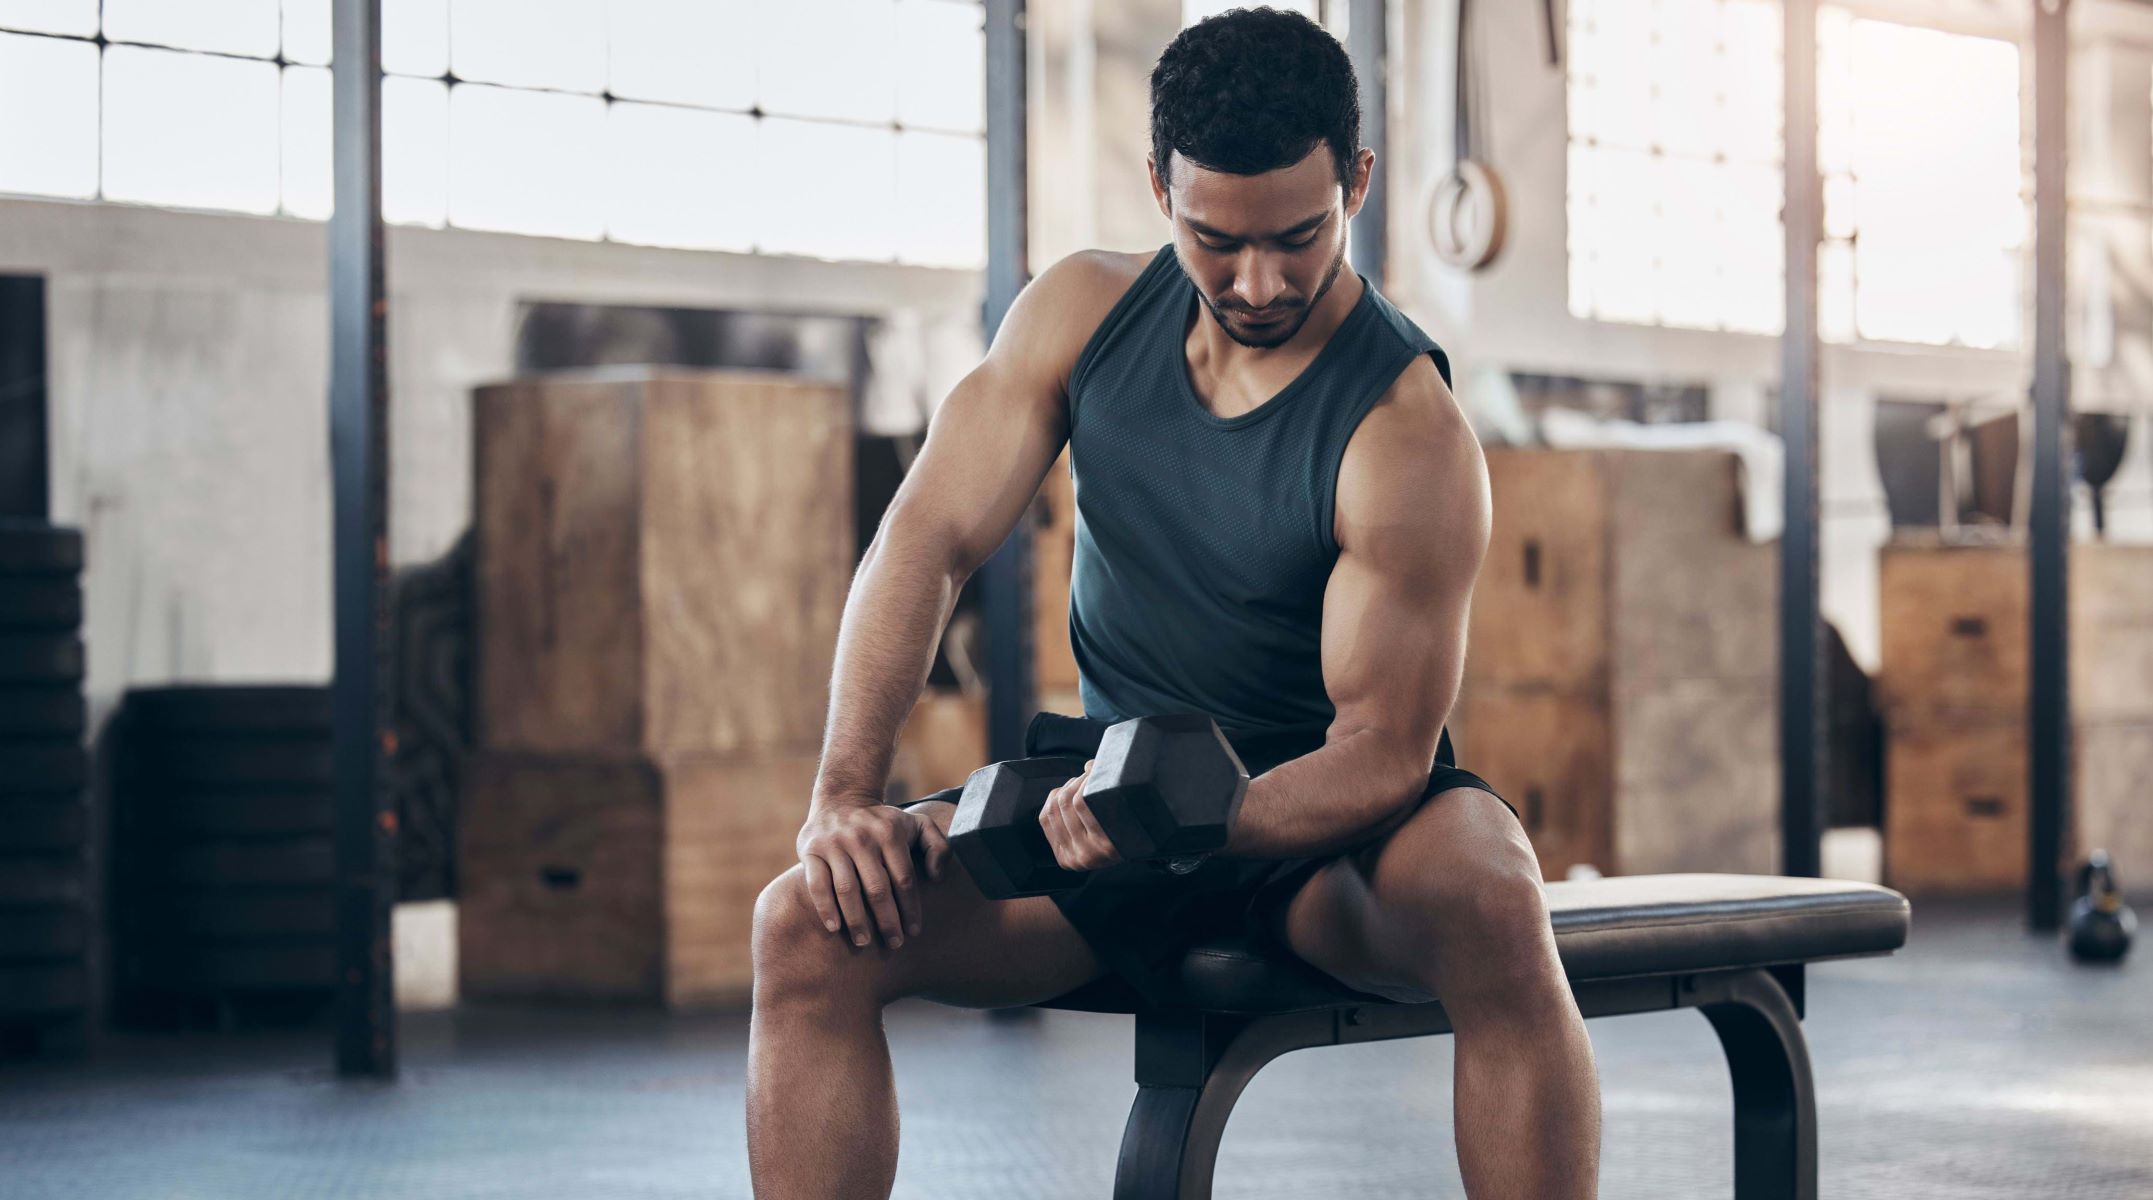
Understanding the Standing Hammer Curl Exercise
The standing hammer curl is a variation of the traditional bicep curl exercise, specifically targeting the brachialis and brachioradialis muscles in addition to the biceps. This exercise is performed by holding a dumbbell in each hand, with the palms facing each other in a neutral grip.
Unlike traditional bicep curls, which focus on supination (rotating the palms upward), the standing hammer curl maintains a neutral grip throughout the movement. This neutral grip works the forearm muscles more intensely, leading to increased strength and mass in the brachialis and brachioradialis.
What sets the standing hammer curl apart from other bicep exercises is that it activates both the elbow flexors (biceps) and the wrist stabilizers (brachialis and brachioradialis). This dual muscle engagement makes it a highly effective exercise for overall arm development.
In addition to targeting multiple muscle groups, the standing hammer curl also has functional benefits. It mimics real-life movements such as carrying groceries or lifting objects with a neutral grip, making it a useful exercise for everyday activities.
It’s worth noting that the standing hammer curl can be performed using dumbbells or a barbell. However, for the purpose of this article, we will focus on the dumbbell version, as it allows for a more natural range of motion and better isolation of the targeted muscles.
Now that we have a clear understanding of what the standing hammer curl is and the muscle groups it targets, let’s move on to why hand position is crucial for performing this exercise correctly.
Importance of Correct Hand Position
Proper hand position is essential when performing the standing hammer curl exercise. It not only allows for maximum muscle engagement but also helps prevent injury and ensures proper form throughout the movement.
Firstly, maintaining the correct hand position ensures that the brachialis and brachioradialis muscles are effectively targeted. These muscles are responsible for flexing the elbow and stabilizing the wrist, respectively. By using a neutral grip with the palms facing each other during the standing hammer curl, these muscles are engaged to a greater extent compared to other bicep exercises.
Moreover, proper hand position helps distribute the load evenly across the forearm, reducing the risk of strain or injury. If the hands are positioned incorrectly, the stress can be transferred to other muscle groups or joints, potentially causing discomfort or even long-term issues.
In addition, maintaining a neutral grip can prevent discomfort in the wrists and elbows. Many individuals experience discomfort or pain in these areas when using a supinated (palm-up) grip, especially if they have pre-existing conditions like tendonitis or carpal tunnel syndrome. The standing hammer curl, with its neutral grip, places less strain on these vulnerable areas.
Correct hand position also contributes to maintaining proper form and preventing cheating during the exercise. By having the palms facing each other, it becomes more challenging to use momentum or excessive shoulder movement to lift the weights. This ensures that the focus remains on the targeted muscles, leading to better muscle activation and more consistent progress over time.
Lastly, using the correct hand position in the standing hammer curl exercise allows for better mind-muscle connection. When the hands are positioned correctly, individuals can feel the targeted muscles working throughout the entire range of motion. This heightened awareness and connection can lead to greater muscle activation and better results.
As we can see, hand position plays a vital role in the effectiveness and safety of the standing hammer curl exercise. By maintaining the proper hand position, individuals can maximize muscle engagement, prevent injury, and achieve optimal results from their workouts.
Incorrect Hand Positions to Avoid
When performing the standing hammer curl exercise, it is important to be aware of and avoid certain hand positions that can compromise the effectiveness of the exercise and increase the risk of injury.
One common mistake is using a pronated grip, where the palms are facing downward. This hand position shifts the focus away from the brachialis and brachioradialis and places more emphasis on the biceps. While this may still target the biceps to some extent, it reduces the involvement of the secondary muscles and limits the overall effectiveness of the exercise.
Another incorrect hand position to avoid is a supinated grip, where the palms face upward. This hand position is more commonly used in traditional bicep curls. However, using a supinated grip in the standing hammer curl reduces the activation of the brachialis and brachioradialis muscles, which are the primary targets of this exercise. It also places unnecessary strain on the wrists and can lead to discomfort or injury.
It is also important to steer clear of using an excessively wide or narrow grip. A wide grip can place additional stress on the shoulders and reduce the isolation of the targeted muscles. On the other hand, a narrow grip can limit the range of motion and compromise the effectiveness of the exercise. Maintaining a shoulder-width grip allows for optimal muscle activation and proper form.
Lastly, avoid gripping the weights too tightly or too loosely. Holding the weights too tightly can create tension in the forearms and limit mobility, while gripping them too loosely can result in a lack of control and stability. Find a grip that feels secure but still allows for fluid movement throughout the exercise.
By being mindful of these incorrect hand positions and actively avoiding them, you can ensure that you are maximizing the effectiveness of the standing hammer curl and minimizing the risk of injury.
Correct Hand Position for Standing Hammer Curls
Now that we understand the importance of maintaining proper hand position during the standing hammer curl exercise and the incorrect hand positions to avoid, let’s take a closer look at the correct hand position to achieve optimal results.
The key to the correct hand position in standing hammer curls is to use a neutral grip. Start by holding a dumbbell in each hand with your palms facing each other. Your thumbs should be pointing forward, and your wrists should be in a straight and neutral position throughout the exercise.
Ensure that your grip on the dumbbells is firm but not excessively tight. This will allow you to maintain control and stability while performing the exercise, without creating unnecessary tension in the forearms.
Keep your elbows close to your sides and maintain a slight bend in the knees for stability. This will help you maintain proper form and prevent any swinging or excessive movement during the exercise.
As you begin the movement, exhale and slowly lift the dumbbells by flexing your elbows. The motion should be controlled and smooth, avoiding any jerking or swinging of the weights. As you reach the top of the movement, squeeze your biceps and pause briefly before slowly lowering the dumbbells back to the starting position.
Throughout the exercise, focus on keeping your wrists and hands in the neutral position, maintaining the same grip and hand position. This will ensure that the brachialis and brachioradialis muscles are effectively targeted, while also reducing strain on the wrists and elbows.
It’s important to note that everyone’s body is different, and hand positioning may vary slightly depending on individual anatomy and comfort. Experiment with your grip and hand position to find what feels most natural and effective for you.
By consistently practicing the correct hand position in your standing hammer curl exercises, you will maximize muscle activation, prevent injuries, and achieve better overall results in your arm development.
Benefits of Maintaining Proper Hand Position
Maintaining the correct hand position during standing hammer curls offers several benefits that enhance the effectiveness and safety of the exercise. Let’s explore the advantages of proper hand positioning:
1. Targeted Muscle Engagement: By using a neutral grip with palms facing each other, the brachialis and brachioradialis muscles are effectively targeted. These muscles are often underdeveloped compared to the biceps, and focusing on them helps create a more well-rounded and balanced arm physique.
2. Balanced Muscle Development: The neutral grip hand position allows for equal activation of the biceps, brachialis, and brachioradialis, promoting balanced muscle development in the arms. This balanced muscle development not only enhances aesthetic appeal but also improves functional strength and performance.
3. Reduced Risk of Injury: Maintaining the correct hand position reduces the risk of strain and injury to the wrists, hands, and elbows. The neutral grip places less stress on these vulnerable areas, promoting joint stability and preventing discomfort or long-term issues.
4. Improved Grip Strength: The neutral grip in standing hammer curls helps to develop grip strength by engaging the muscles responsible for wrist stabilization. Strengthening the grip has numerous benefits, such as improved performance in other exercises and enhanced functionality in daily activities.
5. Increased Mind-Muscle Connection: Maintaining proper hand position allows for a stronger mind-muscle connection. By being mindful of the grip and hand position throughout the exercise, you can better focus on the targeted muscles and feel them working, enhancing muscle activation and optimizing results.
6. More Natural Movement: The neutral grip mimics a natural hand position used in everyday activities, such as carrying objects with a neutral grip. This translates into functional strength that can be applied in real-life situations, making the standing hammer curl exercise more practical and useful.
By maintaining the proper hand position during standing hammer curls, you can unlock these benefits and maximize the effectiveness of your arm workouts. Remember to stay consistent and focus on form to reap the rewards of improved muscle engagement, reduced risk of injury, and enhanced overall arm development.
Tips for Executing the Exercise Correctly
To ensure you execute the standing hammer curl exercise correctly and get the most out of your workout, consider applying the following tips:
1. Warm Up: Before starting any exercise, it’s essential to warm up your muscles with some light cardiovascular activity and dynamic stretches. This prepares your body for the workout and reduces the risk of injury.
2. Start with Proper Form: Begin the exercise by standing with your feet shoulder-width apart and maintaining good posture. Keep your core engaged, shoulders back and down, and chest upright. This ensures a stable base and proper alignment throughout the movement.
3. Focus on Control: Maintain controlled movements throughout the exercise, avoiding any swinging or using momentum to lift the weights. This allows for better muscle engagement and prevents the risk of injury.
4. Keep Elbows Stationary: Avoid excessive movement in your elbows during the exercise. Keep your elbows close to your sides and maintain that position throughout the movement. This helps isolate and target the desired muscle groups effectively.
5. Breathe Correctly: Practice proper breathing techniques during the exercise. Exhale as you lift the weights and contract your muscles, and inhale as you lower the weights back down. This helps stabilize your core and regulate your breathing pattern.
6. Use Appropriate Weight: Choose dumbbells that allow you to perform the exercise with proper form and without straining. It’s better to start with lighter weights and gradually increase the load as your strength improves.
7. Gradual Progression: Gradually increase the intensity of your workouts by adding more weight or increasing the number of repetitions. This progressive overload helps promote muscle growth and continual improvement.
8. Mind-Muscle Connection: Focus on the targeted muscles throughout the exercise. Visualize contracting the biceps, brachialis, and brachioradialis as you lift the weights, enhancing the mind-muscle connection and optimizing results.
9. Recovery and Rest: Allow your muscles time to recover and rebuild between workouts. Incorporate rest days into your training program and prioritize sleep and proper nutrition to support muscle growth and repair.
10. Seek Professional Guidance: If you’re new to weightlifting or unsure about your technique, consider working with a certified personal trainer. They can provide guidance, correct your form, and tailor a workout plan to meet your specific goals.
By incorporating these tips into your routine, you’ll be able to execute the standing hammer curl exercise correctly and maximize the benefits of this highly effective arm exercise.
Conclusion
The standing hammer curl exercise is a valuable addition to any strength training routine, targeting the biceps, brachialis, and brachioradialis muscles. However, to fully benefit from this exercise, it is crucial to maintain the correct hand position throughout the movement.
By using a neutral grip with the palms facing each other, you can effectively engage the targeted muscles and reduce the risk of injury. The neutral grip allows for balanced muscle development, improved grip strength, and enhanced mind-muscle connection.
Avoiding incorrect hand positions, such as pronated or supinated grips, and adjusting the width and tightness of your grip, will ensure that you are maximizing the effectiveness of the exercise. Additionally, paying attention to proper form, breathing, and gradually increasing the intensity of your workouts will help you achieve optimal results.
Remember to warm up before performing the exercise, focus on control and stability, and listen to your body’s limits. If you’re uncertain about your technique or require further assistance, don’t hesitate to seek guidance from a certified fitness professional.
By incorporating the tips and techniques discussed in this article, you can achieve better muscle activation, reduced risk of injury, and improved arm development through your standing hammer curl workouts. So, maintain the correct hand position, stay consistent, and enjoy the benefits of this effective arm exercise in your fitness journey.