Brands
How To Lubricate A Xterra Treadmill
Modified: January 2, 2024
Learn how to properly lube your Xterra treadmill with our comprehensive guide. Discover the best brands for keeping your machine running smoothly and efficiently.
Introduction
Welcome to your guide to properly lubricating your Xterra treadmill. Regular lubrication is a crucial aspect of treadmill maintenance that often gets overlooked. By lubricating the treadmill belt, you can extend its lifespan, ensure smooth operation, minimize noise, and reduce the strain on the motor. In this article, we will walk you through the step-by-step process of lubing your Xterra treadmill, ensuring that you can keep it running in optimal condition for years to come.
A treadmill is a significant investment, and proper maintenance is key to getting the most out of it. Many treadmill owners neglect the lubrication process, unaware of its importance. Over time, the treadmill belt can become dry and worn, leading to increased friction and potential damage to the motor. With regular lubrication, you can prevent these issues and keep your treadmill performing at its best.
We will guide you through the entire process, from gathering the necessary supplies to applying the lubricant correctly and testing the treadmill afterwards. Additionally, we’ll provide some tips for ongoing treadmill maintenance, so you can keep it in top-notch condition for as long as possible.
So, whether you’re a seasoned treadmill owner or new to the world of fitness equipment, this guide is here to help you properly lube your Xterra treadmill. Let’s get started!
Understanding the Importance of Regular Lubrication
Regular lubrication of your Xterra treadmill is essential for maintaining optimal performance and extending its lifespan. The treadmill belt is subjected to constant friction and wear as you walk, jog, or run on it. Over time, this can lead to the belt becoming dry, creating more friction and strain on the motor.
By regularly lubricating your treadmill, you can prevent these issues and ensure smooth and quiet operation. The lubricant acts as a protective barrier between the belt and the deck, reducing friction and minimizing wear. This not only enhances your workout experience but also prolongs the life of your treadmill.
Lubrication also helps maintain the integrity of the motor and other components. When the belt is properly lubricated, it reduces the strain on the motor, preventing excessive wear and tear. This, in turn, helps prevent costly repairs down the line, saving you time and money.
Proper lubrication also plays a significant role in reducing noise. An unlubricated belt can cause squeaks and squeals that can disrupt your workout or disturb the peace in your home. By applying lubricant regularly, you can enjoy a quiet and noise-free workout environment.
Moreover, regular lubrication ensures that your treadmill operates smoothly and efficiently. A well-lubricated belt reduces the need for excessive force when walking or running, allowing for a more comfortable and enjoyable workout. It also helps maintain the accuracy of speed and incline settings, ensuring that you get the most out of your treadmill’s features.
It’s important to note that different treadmill models may require different types of lubricants. It’s recommended to refer to the manufacturer’s guidelines or consult the user manual to determine the appropriate lubricant for your Xterra treadmill. Using the wrong type of lubricant can potentially damage the belt and other components, so it’s crucial to follow the manufacturer’s recommendations.
Now that we understand the importance of regular lubrication, let’s move on to the next section to gather the necessary supplies for the process.
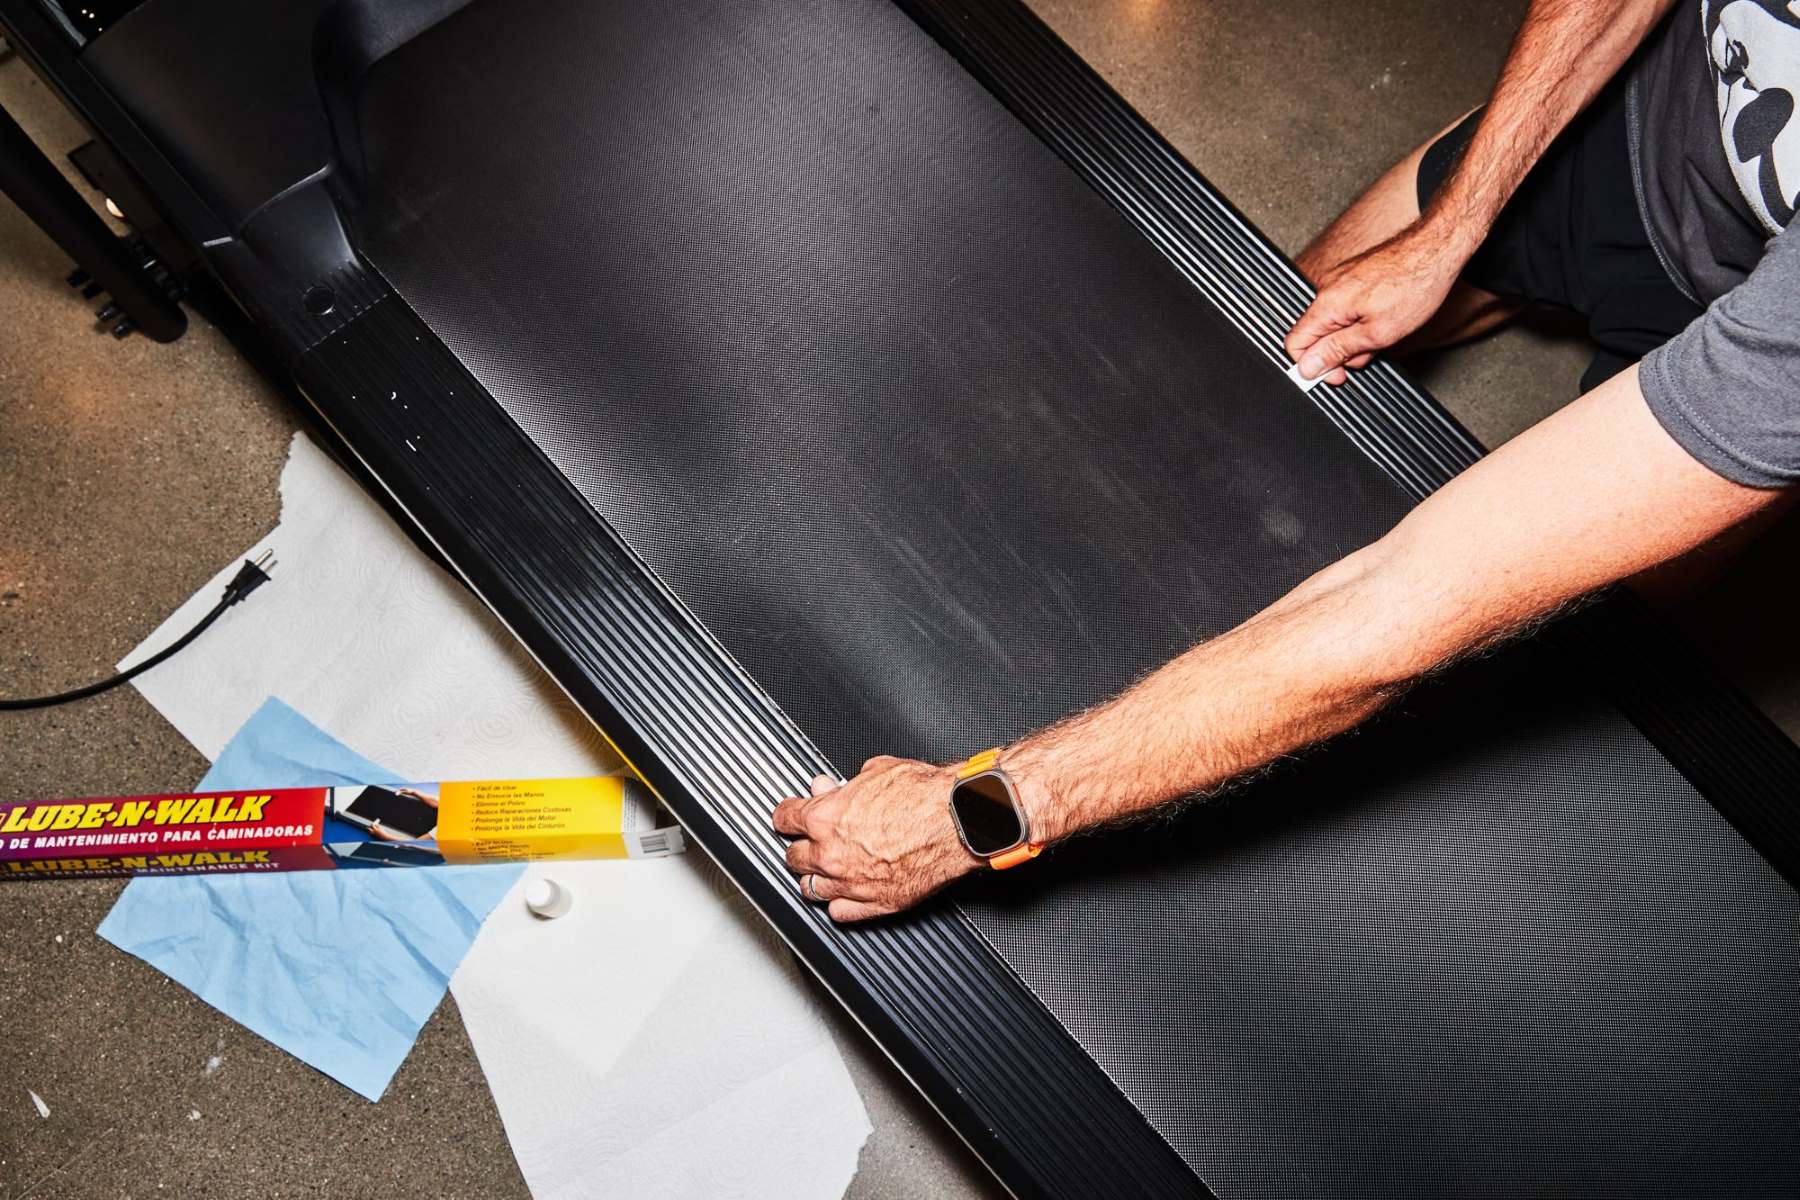
Gather the Necessary Supplies
Before you begin the lubrication process for your Xterra treadmill, it’s important to gather all the necessary supplies. By having everything on hand, you can ensure a smooth and efficient lubrication process without any interruptions.
Here are the essential items you will need:
- Treadmill lubricant: Ensure that you have the correct type of lubricant recommended by the manufacturer for your specific Xterra treadmill model. Using the wrong lubricant can potentially damage the belt and other components.
- Clean cloth or towel: You’ll need a clean cloth or towel to wipe down the treadmill belt and remove any dirt or debris before applying the lubricant.
- Lint-free cloth or applicator pad: This is used to apply the lubricant onto the treadmill belt. A lint-free cloth or an applicator pad specifically designed for lubricant application will help ensure even distribution.
- Treadmill deck cleaner (optional): If your treadmill deck is dirty or has accumulated debris, you may want to consider using a treadmill deck cleaner to thoroughly clean it before lubricating the belt.
- Allen wrench or screwdriver: Some treadmill models may require you to loosen or remove screws or bolts to access the treadmill belt and deck. Check your user manual to determine if you need any specific tools.
It’s important to note that the required supplies may vary depending on your specific treadmill model. Be sure to consult your user manual or manufacturer’s guidelines to ensure you have everything you need for the lubrication process.
Once you have gathered all the necessary supplies, you’re ready to move on to the next section: preparing the treadmill for lubrication.
Prepare the Treadmill for Lubrication
Before applying lubricant to your Xterra treadmill, it’s important to properly prepare the machine. This will ensure that the lubrication process is carried out effectively and without any complications.
Follow these steps to prepare your treadmill for lubrication:
- Turn off the treadmill: Before starting any maintenance or lubrication procedures, make sure your treadmill is completely powered off. This will prevent any accidents or injuries during the process.
- Unplug the treadmill: Safely unplug the treadmill from the power source to eliminate the risk of accidental start-up.
- Remove the safety key: Take out the safety key from the console. This step is crucial to ensure that the treadmill belt remains stationary throughout the lubrication process.
- Adjust the incline: Set the treadmill incline to its lowest position. This will make it easier to access and lubricate the entire treadmill belt evenly.
- Inspect the treadmill belt: Carefully examine the treadmill belt for any signs of damage, wear, or fraying. If you notice any issues with the belt, such as tears or rips, it’s advisable to replace it before proceeding with the lubrication process.
- Clean the treadmill belt and deck: Use a clean cloth or towel to wipe down the treadmill belt and deck. Remove any dirt, dust, or debris present on the surface. This step ensures that the lubricant will be applied to a clean and smooth surface.
- Tighten any loose screws or bolts: Check the treadmill for any loose screws or bolts. If you find any, use an Allen wrench or screwdriver to tighten them as necessary. Ensuring that all components are secure will prevent unnecessary vibrations or disturbances during the lubrication process.
By properly preparing your Xterra treadmill for lubrication, you set the stage for a successful maintenance routine. With the treadmill in the appropriate condition, you can now move on to the next step: applying lubricant to the treadmill belt.
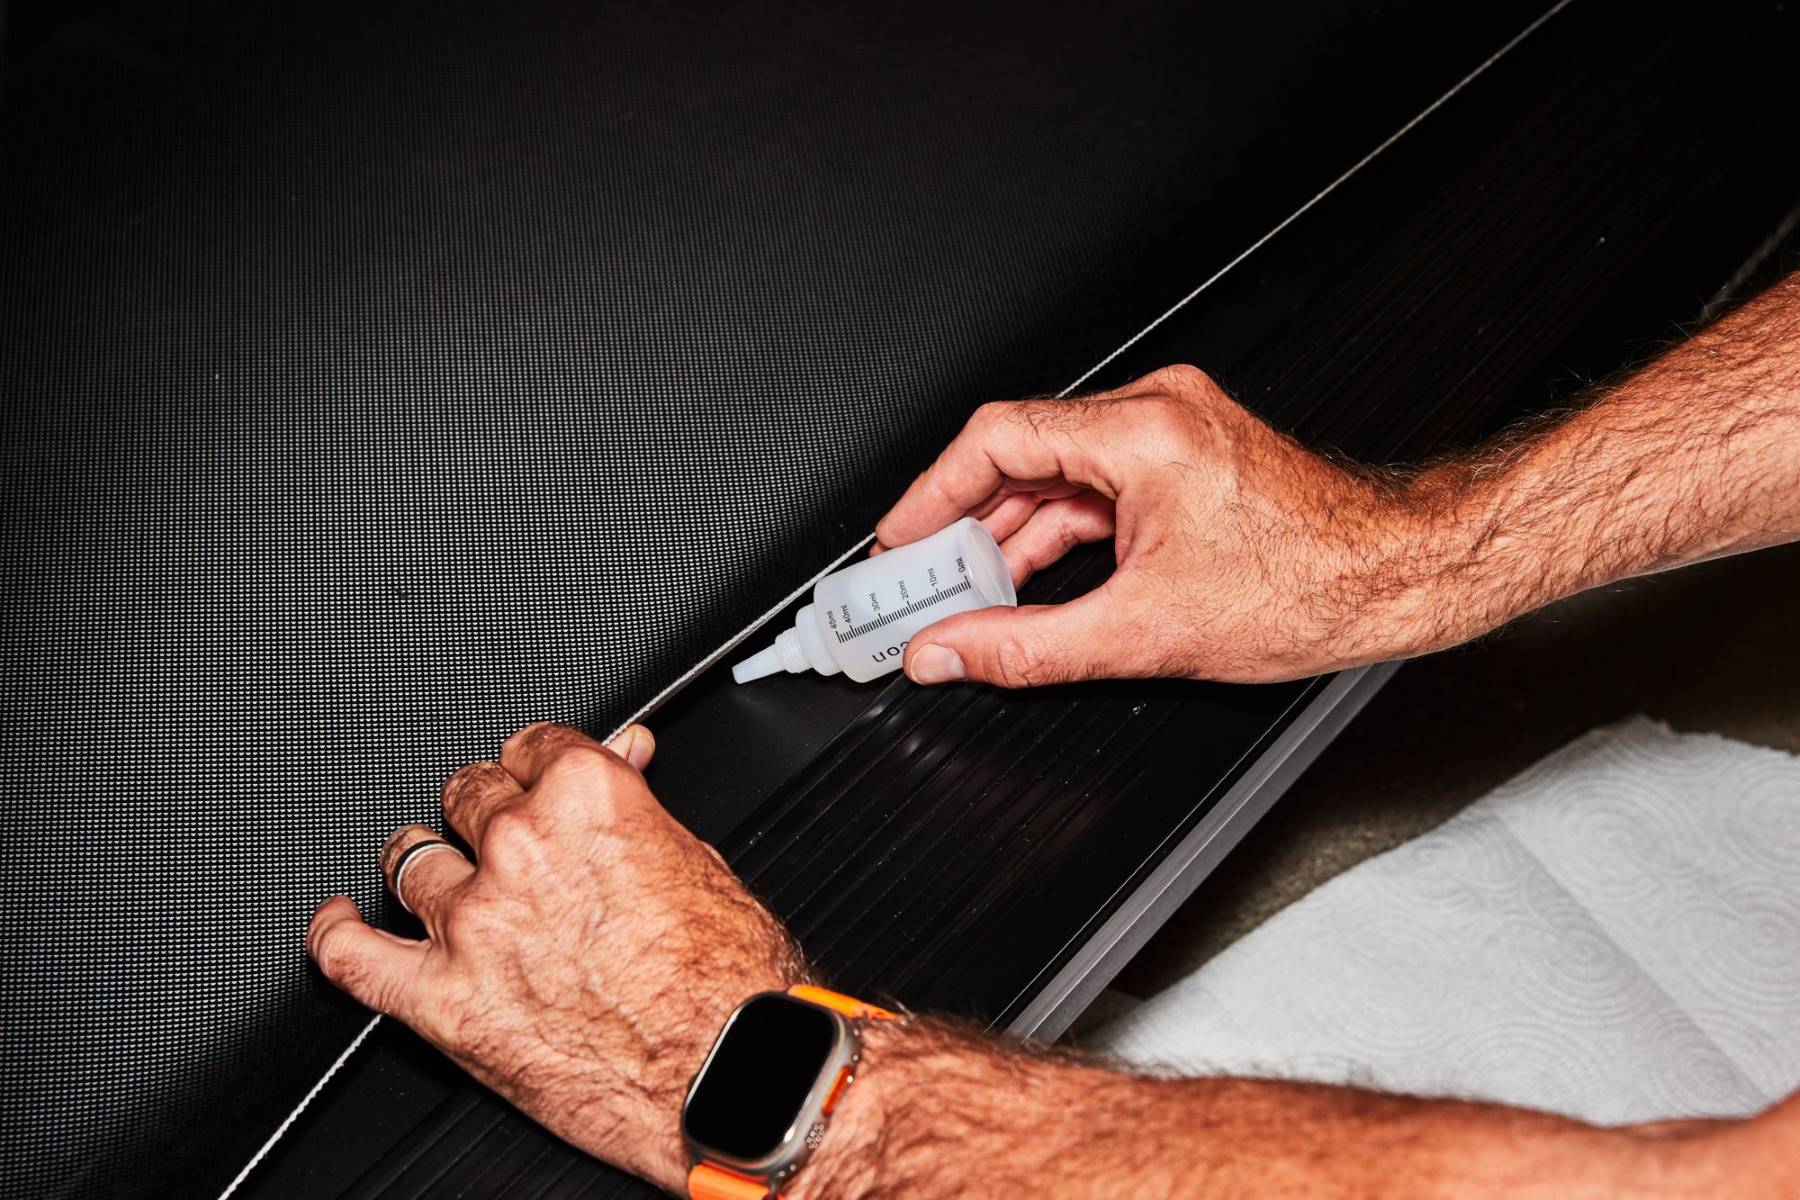
Applying Lubricant to the Treadmill Belt
Now that you have prepared your Xterra treadmill, it’s time to apply the lubricant to the treadmill belt. This step is crucial for ensuring smooth operation and prolonging the life of your machine.
Follow these steps to properly apply lubricant to the treadmill belt:
- Refer to the manufacturer’s guidelines: Before applying the lubricant, it’s important to consult your Xterra treadmill’s user manual or manufacturer’s guidelines. These resources will provide specific instructions on the type of lubricant to use and the amount needed for your treadmill model.
- Locate the access points: Identify the access points to the treadmill belt and deck, as shown in the user manual. This may involve removing a protective cover or loosening screws or bolts to access the belt and deck properly. Use the appropriate tools, such as an Allen wrench or screwdriver, as needed.
- Apply the lubricant: Using a lint-free cloth or an applicator pad, apply the lubricant to the inside of the treadmill belt. Start at one end of the belt and work your way to the other end, ensuring that the lubricant is applied evenly across the entire width of the belt. Be sure to follow the manufacturer’s guidelines for the recommended amount of lubricant to use.
- Avoid over-lubricating: It’s important not to over-lubricate the treadmill belt. This can lead to excessive slipping and may negatively impact the performance of your treadmill. Follow the manufacturer’s guidelines to ensure proper application.
- Spread the lubricant: Once the lubricant is applied, engage the treadmill motor by carefully plugging in the power cord. Set the treadmill to the lowest speed and allow it to run for a few minutes. This will help distribute the lubricant evenly across the entire surface of the belt.
Remember, each treadmill model may have specific instructions for lubrication. It’s essential to consult the user manual or manufacturer’s guidelines to ensure that you are following the correct procedure for your Xterra treadmill.
With the lubricant applied and distributed evenly, your treadmill is now ready for the next step: distributing the lubricant evenly across the belt.
Distributing the Lubricant Evenly
After applying the lubricant to your Xterra treadmill’s belt, the next step is to ensure that it is distributed evenly. Proper distribution of the lubricant ensures smooth operation and optimal performance of the treadmill.
Here’s how you can distribute the lubricant evenly across the treadmill belt:
- Run the treadmill at a slow speed: Start by setting the treadmill to a slow walking speed. This will allow the lubricant to spread evenly across the entire surface of the belt.
- Monitor the lubricant distribution: As the treadmill runs, keep an eye on the belt to ensure that the lubricant is spreading evenly. Look out for any areas that appear dry or where the lubricant seems to be pooling.
- Adjust the tension if needed: If you notice areas with uneven distribution of the lubricant, you may need to adjust the tension of the treadmill belt. Most Xterra treadmills have an adjustable tension system that allows you to tighten or loosen the belt. Refer to your user manual for instructions on how to make the necessary adjustments.
- Continue running the treadmill: Allow the treadmill to run for approximately 5-10 minutes to ensure that the lubricant is evenly distributed. This will help optimize the performance of your Xterra treadmill.
It’s important to note that some treadmills have a specific “lubrication mode” that you can engage to help distribute the lubricant. Consult your user manual to see if your Xterra treadmill has this feature and follow the instructions provided.
By ensuring that the lubricant is distributed evenly, you help maintain the longevity and functionality of your treadmill. Now that you have completed this step, it’s time to move on to the next section: testing the treadmill.
Test the Treadmill
After lubricating your Xterra treadmill and ensuring the even distribution of the lubricant, it’s important to test the treadmill to ensure that it is running smoothly and efficiently. This step allows you to make any necessary adjustments and verify that the lubrication process was successful.
Follow these steps to properly test your treadmill:
- Check the belt tension: Before running the treadmill, check the tension of the belt. It should feel tight enough that you can walk, jog, or run on it without any slipping or excessive movement. Adjust the tension if needed, following your user manual’s instructions.
- Power on the treadmill: Plug in the treadmill and turn it on. Allow it to boot up and bring the console to the main menu.
- Set the speed and incline: Choose a low speed and incline setting to start. This allows you to gradually test the treadmill’s performance and observe any potential issues.
- Walk, jog, or run on the treadmill: Begin your workout by walking, jogging, or running on the treadmill. Pay attention to any unusual noises, vibrations, or slipping of the belt.
- Observe the treadmill’s performance: As you exercise, note if the treadmill belt is smooth and quiet or if there are any abnormalities. Ensure that the lubrication has effectively reduced friction and improved the overall operation of the machine.
- Make necessary adjustments: If you notice any issues during the test, such as excessive belt slipping or unusual noises, consult your user manual for troubleshooting tips. You may need to make further adjustments to the tension or contact customer support for assistance.
By thoroughly testing your Xterra treadmill, you can ensure that the lubrication process has been successful and that the treadmill is operating smoothly. Addressing any issues promptly will help maintain the longevity and performance of your machine.
Now that you have tested your treadmill and verified its functionality, it’s important to maintain it properly to ensure its long-term durability. In the next section, we will provide some tips for maintaining your Xterra treadmill.
Maintaining the Treadmill for Longevity
Proper maintenance is key to ensuring the longevity and optimal performance of your Xterra treadmill. By following a few simple steps, you can keep your treadmill in excellent condition and enjoy many years of successful workouts.
Here are some essential tips for maintaining your treadmill:
- Regular cleaning: Dust and debris can accumulate on the treadmill belt, deck, and console. Regularly clean these areas using a soft, lint-free cloth or towel to remove any dirt, sweat, or debris. Avoid using harsh or abrasive chemicals that may damage the treadmill’s components.
- Inspect and tighten bolts: Over time, the vibrations from the treadmill can cause bolts and screws to come loose. Periodically inspect the treadmill for any loose bolts or screws and tighten them as needed. This step helps to keep the treadmill stable and prevents unnecessary wear and tear.
- Keep the area around the treadmill clear: Ensure that the area around your treadmill is clear of any obstacles or clutter. This will prevent accidental tripping or interference during your workout. It’s also important to maintain proper ventilation around the treadmill to prevent overheating.
- Monitor the belt tension: Regularly check the tension of the treadmill belt to ensure it is properly aligned and tightened. A loose or misaligned belt can lead to slipping or uneven wear. Follow your user manual’s instructions for adjusting the belt tension to maintain optimal performance.
- Keep the treadmill lubricated: Regularly lubricate the treadmill belt as instructed by the manufacturer. This will reduce friction, minimize wear and tear, and ensure smooth operation. Refer to our previous sections on how to properly apply and distribute the lubricant on your Xterra treadmill.
- Follow the manufacturer’s maintenance schedule: Each treadmill model may have specific maintenance recommendations outlined in the user manual. These can include tasks such as belt alignment, motor brushes inspection, or deck cleaning. Follow the manufacturer’s maintenance schedule to ensure your treadmill remains in top condition.
By incorporating these maintenance practices into your routine, you can enhance the longevity and performance of your Xterra treadmill. Regular cleaning, bolt tightening, and proper lubrication will keep your treadmill running smoothly, allowing you to enjoy effective and enjoyable workouts for years to come.
Remember that prevention is key when it comes to treadmill maintenance. By addressing any issues promptly and following the manufacturer’s guidelines, you can avoid more significant problems in the future.
Now that you have learned how to maintain your treadmill, you are equipped with the knowledge to prolong its lifespan and optimize its performance.
Conclusion
Congratulations! You have successfully learned how to properly lubricate your Xterra treadmill and maintain it for optimal performance and longevity. Regular lubrication of the treadmill belt is essential to reduce friction, minimize wear and tear, and ensure smooth operation. By following the step-by-step process outlined in this guide, you can keep your treadmill running smoothly and enjoy years of productive workouts.
Remember to gather all the necessary supplies before starting the lubrication process and prepare your treadmill by turning it off, unplugging it, and cleaning the belt and deck. Applying the lubricant evenly and distributing it properly across the belt is crucial for optimum performance. Testing your treadmill after lubrication allows you to ensure the effectiveness of the lubrication process and make any necessary adjustments.
Maintaining your treadmill for longevity involves regular cleaning, inspecting and tightening bolts, keeping the area clear, monitoring belt tension, and following the manufacturer’s maintenance schedule. By incorporating these practices into your routine, you can prolong the life of your Xterra treadmill and enjoy consistent, hassle-free workouts.
Remember to consult your treadmill’s user manual or manufacturer’s guidelines for specific instructions and recommendations tailored to your Xterra treadmill model. Following their guidelines will ensure that you are taking the necessary steps to maintain your machine properly.
With proper maintenance and routine lubrication, you can maximize the lifespan of your Xterra treadmill while enjoying smooth and efficient workouts. So, keep up with the maintenance schedule, listen to your treadmill’s needs, and enjoy the benefits of a well-maintained and smoothly functioning Xterra treadmill for years to come!