Featured
How To Lubricate A Sole Treadmill
Modified: January 2, 2024
Want to know how to keep your Sole treadmill running smoothly? Check out our featured guide on lubricating a Sole treadmill for optimal performance.
Introduction
Welcome to the world of fitness and exercise! If you’re a proud owner of a Sole Treadmill, you already know the importance of regular maintenance to keep it running smoothly and efficiently. One crucial aspect of treadmill maintenance is lubrication. Proper lubrication not only prolongs the lifespan of your treadmill but also ensures a safe and enjoyable workout experience.
In this article, we will guide you through the step-by-step process of lubricating your Sole Treadmill. Whether you’re a seasoned treadmill owner or a beginner, this article will provide you with all the necessary information to keep your treadmill in top-notch condition.
Lubricating your treadmill is not a complex task, and it shouldn’t be a daunting chore. We will break down the process into simple and easy-to-follow steps, ensuring that you have a hassle-free experience. By following these steps, you will ensure smooth belt operation, reduce friction, and minimize noise levels. So, let’s get started!
Step 1: Gather the necessary materials
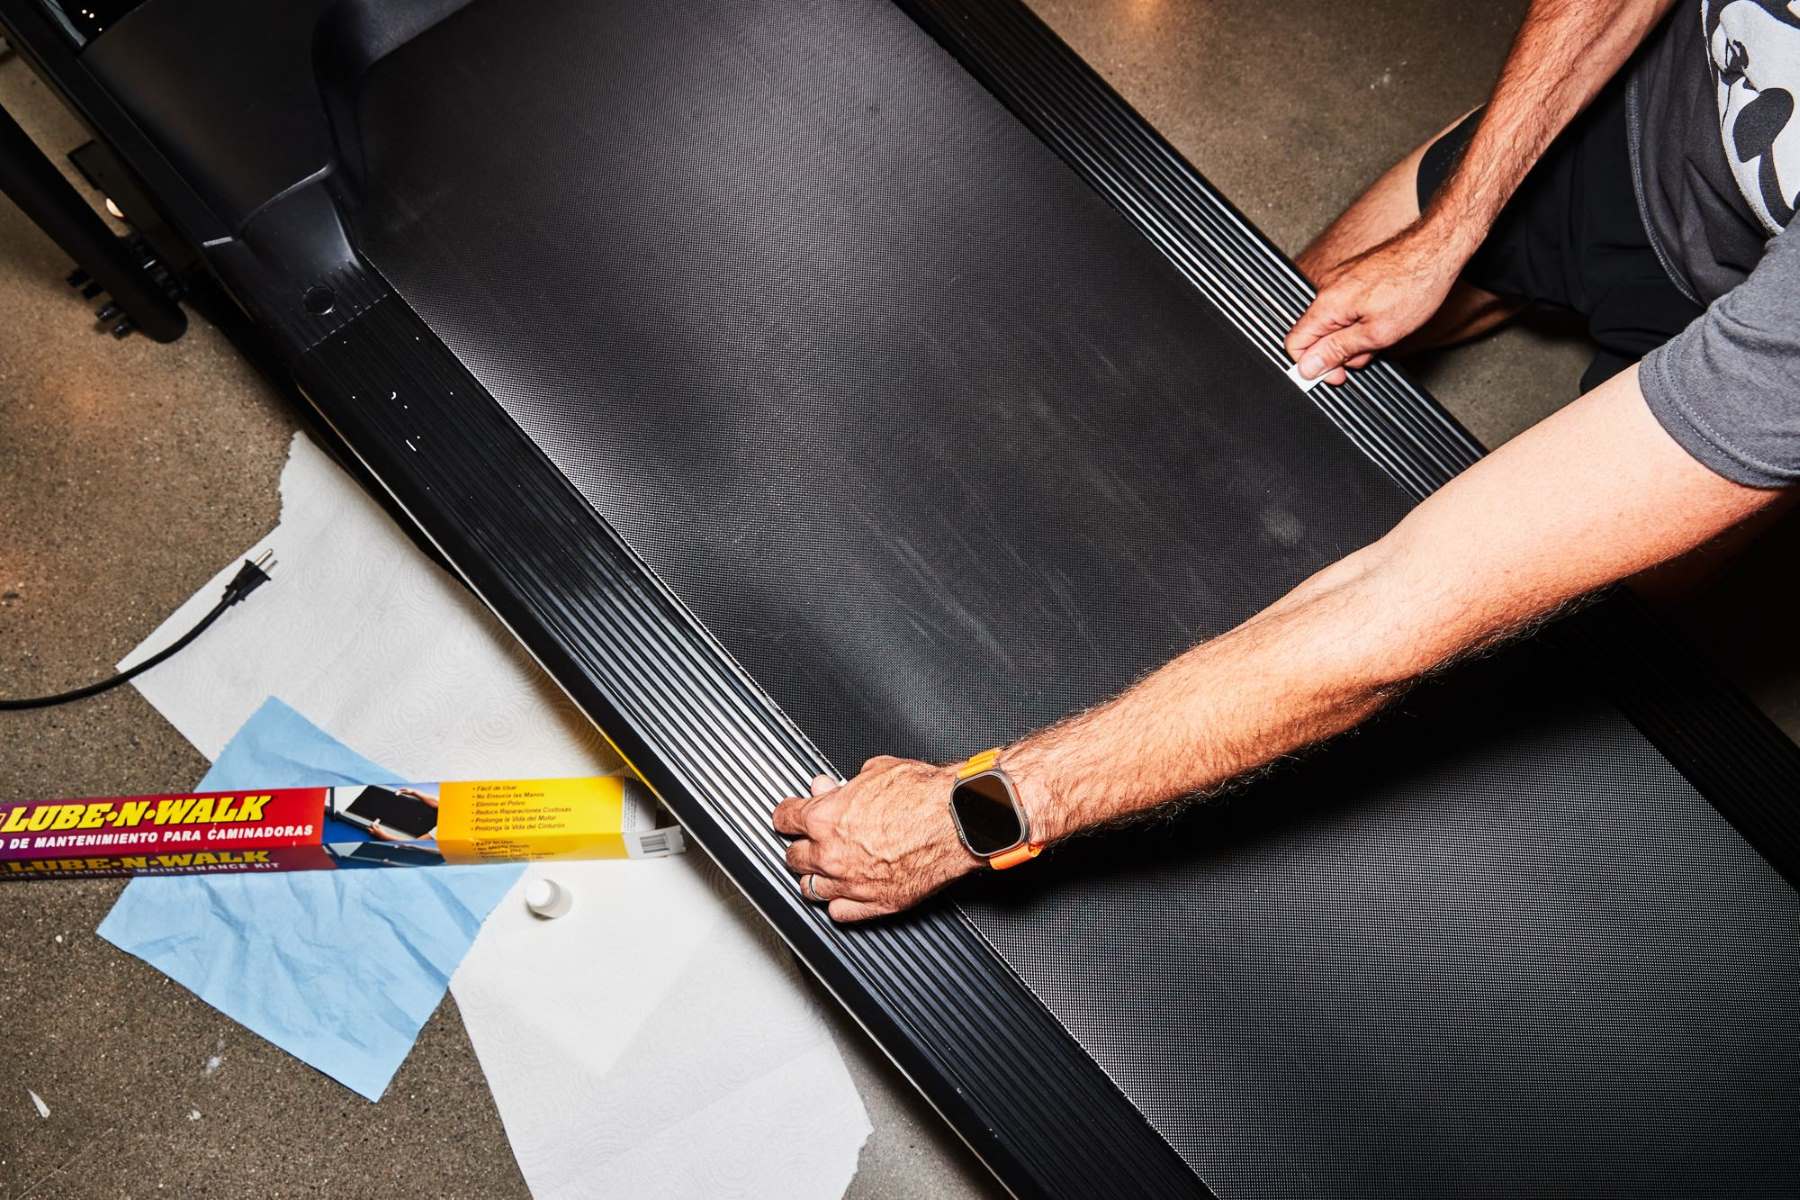
Before you begin the lubrication process, it’s essential to gather all the necessary materials. This will ensure that you have everything you need at your fingertips, saving you time and unnecessary interruptions during the process. Here’s a list of the materials you’ll need:
- Treadmill lubricant: Check your treadmill’s manual or contact the manufacturer to find out the recommended lubricant. Make sure you use a high-quality silicone-based lubricant that is specifically designed for treadmills. Avoid using oils, greases, or WD-40, as they can damage the treadmill belt and deck.
- Clean cloth or towel: You’ll need a clean cloth or towel to wipe the treadmill belt and deck before applying the lubricant. Make sure it’s lint-free to prevent any debris from getting trapped.
- Treadmill belt cleaner: While not mandatory, using a treadmill belt cleaner can help remove any dirt, dust, or residue that may have accumulated on the belt. This step will ensure a clean surface for the lubricant to adhere to.
- Treadmill brush: A treadmill brush is a handy tool for cleaning the belt and removing any debris or particles that may have become lodged in the crevices. It helps to maintain the cleanliness and functionality of the treadmill.
Once you have gathered all these materials, you’re ready to move on to the next step: preparing your treadmill for lubrication.
Step 2: Prepare the treadmill
Before you start applying the lubricant, it’s crucial to prepare your treadmill to ensure a smooth and effective lubrication process. Follow these steps to prepare your treadmill:
- Turn off the treadmill: Make sure your treadmill is completely turned off and unplugged from the power source. This step is essential for your safety and to prevent any accidental activation of the treadmill during the lubrication process.
- Elevate the treadmill: Check if your treadmill has an incline feature. If it does, raise the incline to its highest level. This will provide better access to the underside of the treadmill belt and make the lubrication process easier.
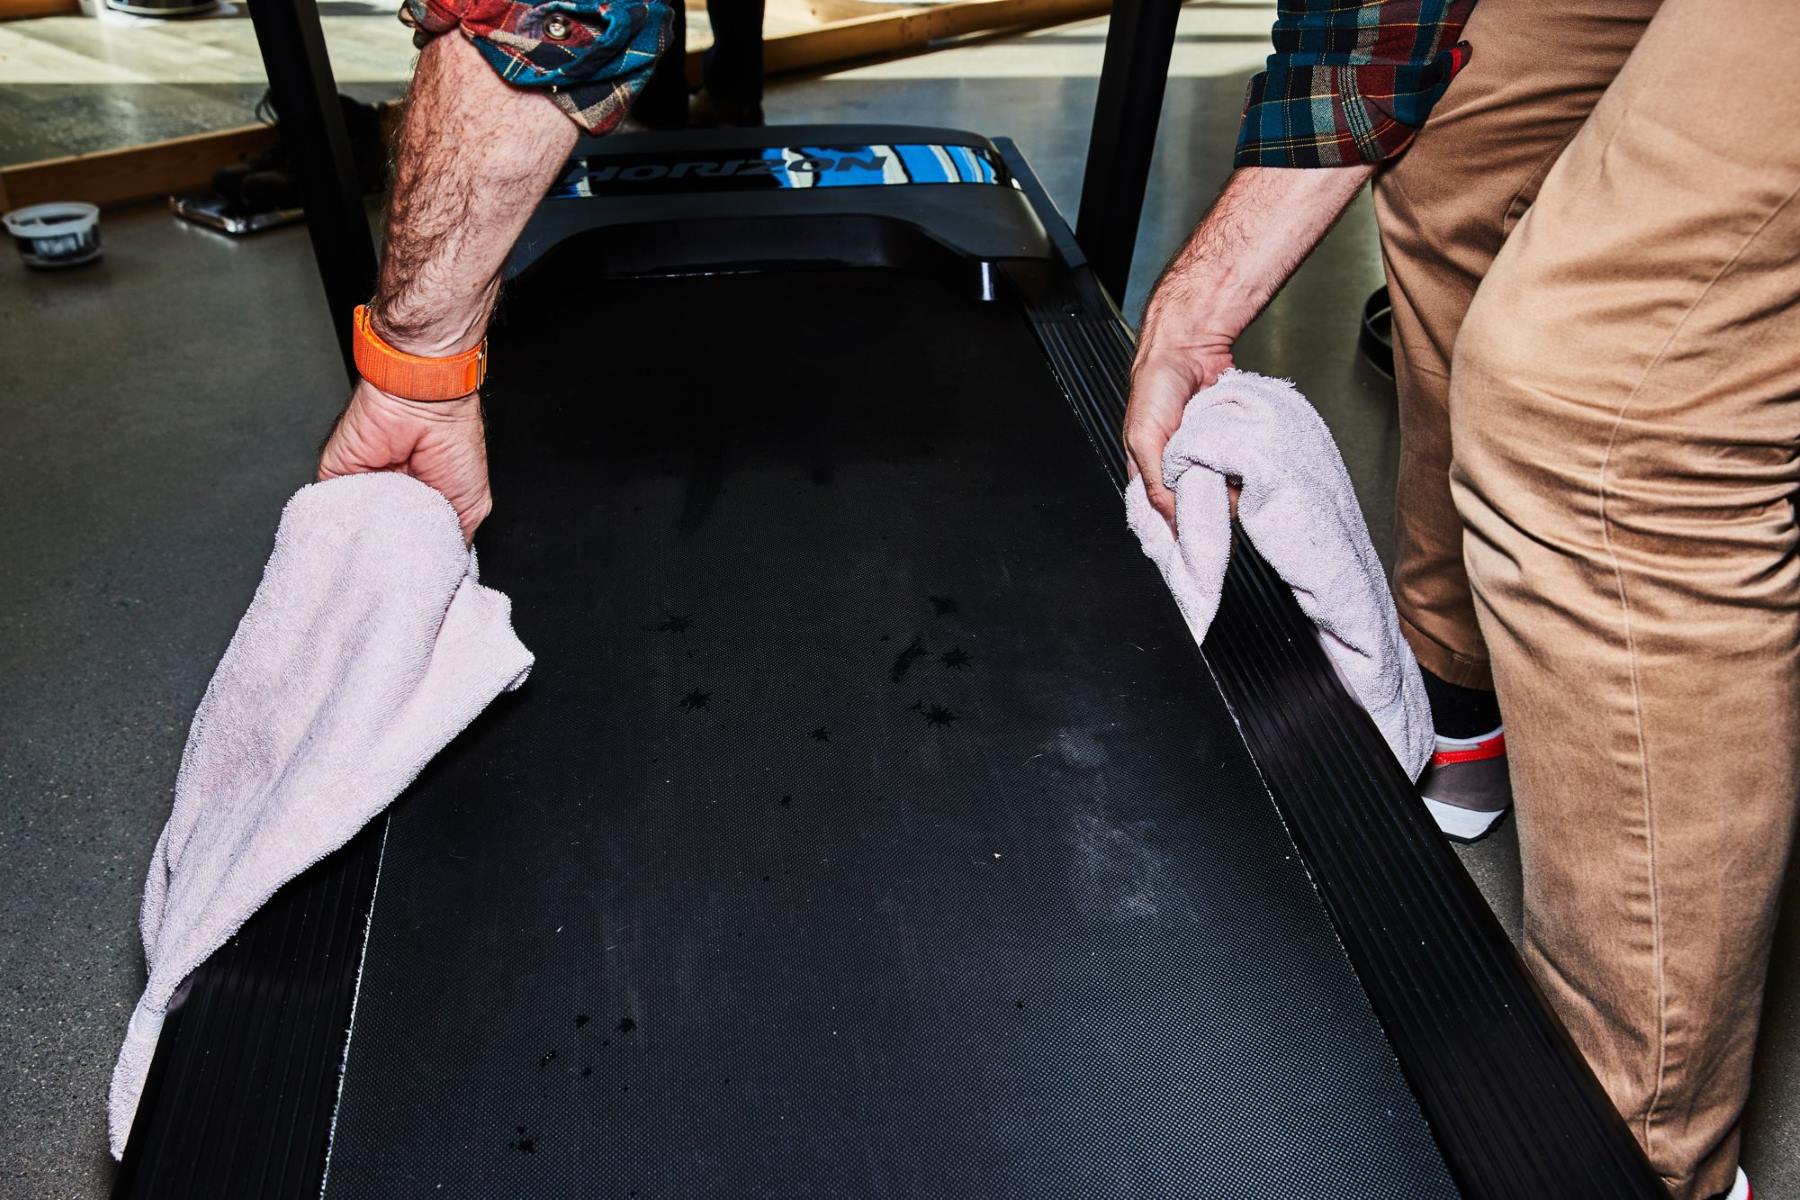
- Inspect the belt and deck: Take a moment to visually inspect the treadmill belt and deck. Look for any signs of wear, fraying, or damage. If you notice any issues, it’s best to address them before lubricating to prevent further damage.
- Clean the belt and deck: Use a clean cloth or towel to wipe down the treadmill belt and deck. If you have a treadmill belt cleaner, spray it on the belt and use a treadmill brush to scrub away any dirt, dust, or residue. This step ensures a clean surface for the lubricant to adhere to.
By following these preparation steps, you’ll ensure that your treadmill is ready for the lubrication process. Taking the time to properly prepare your treadmill will optimize the effectiveness of the lubricant and ensure a smoother running experience.
Step 3: Apply the lubricant
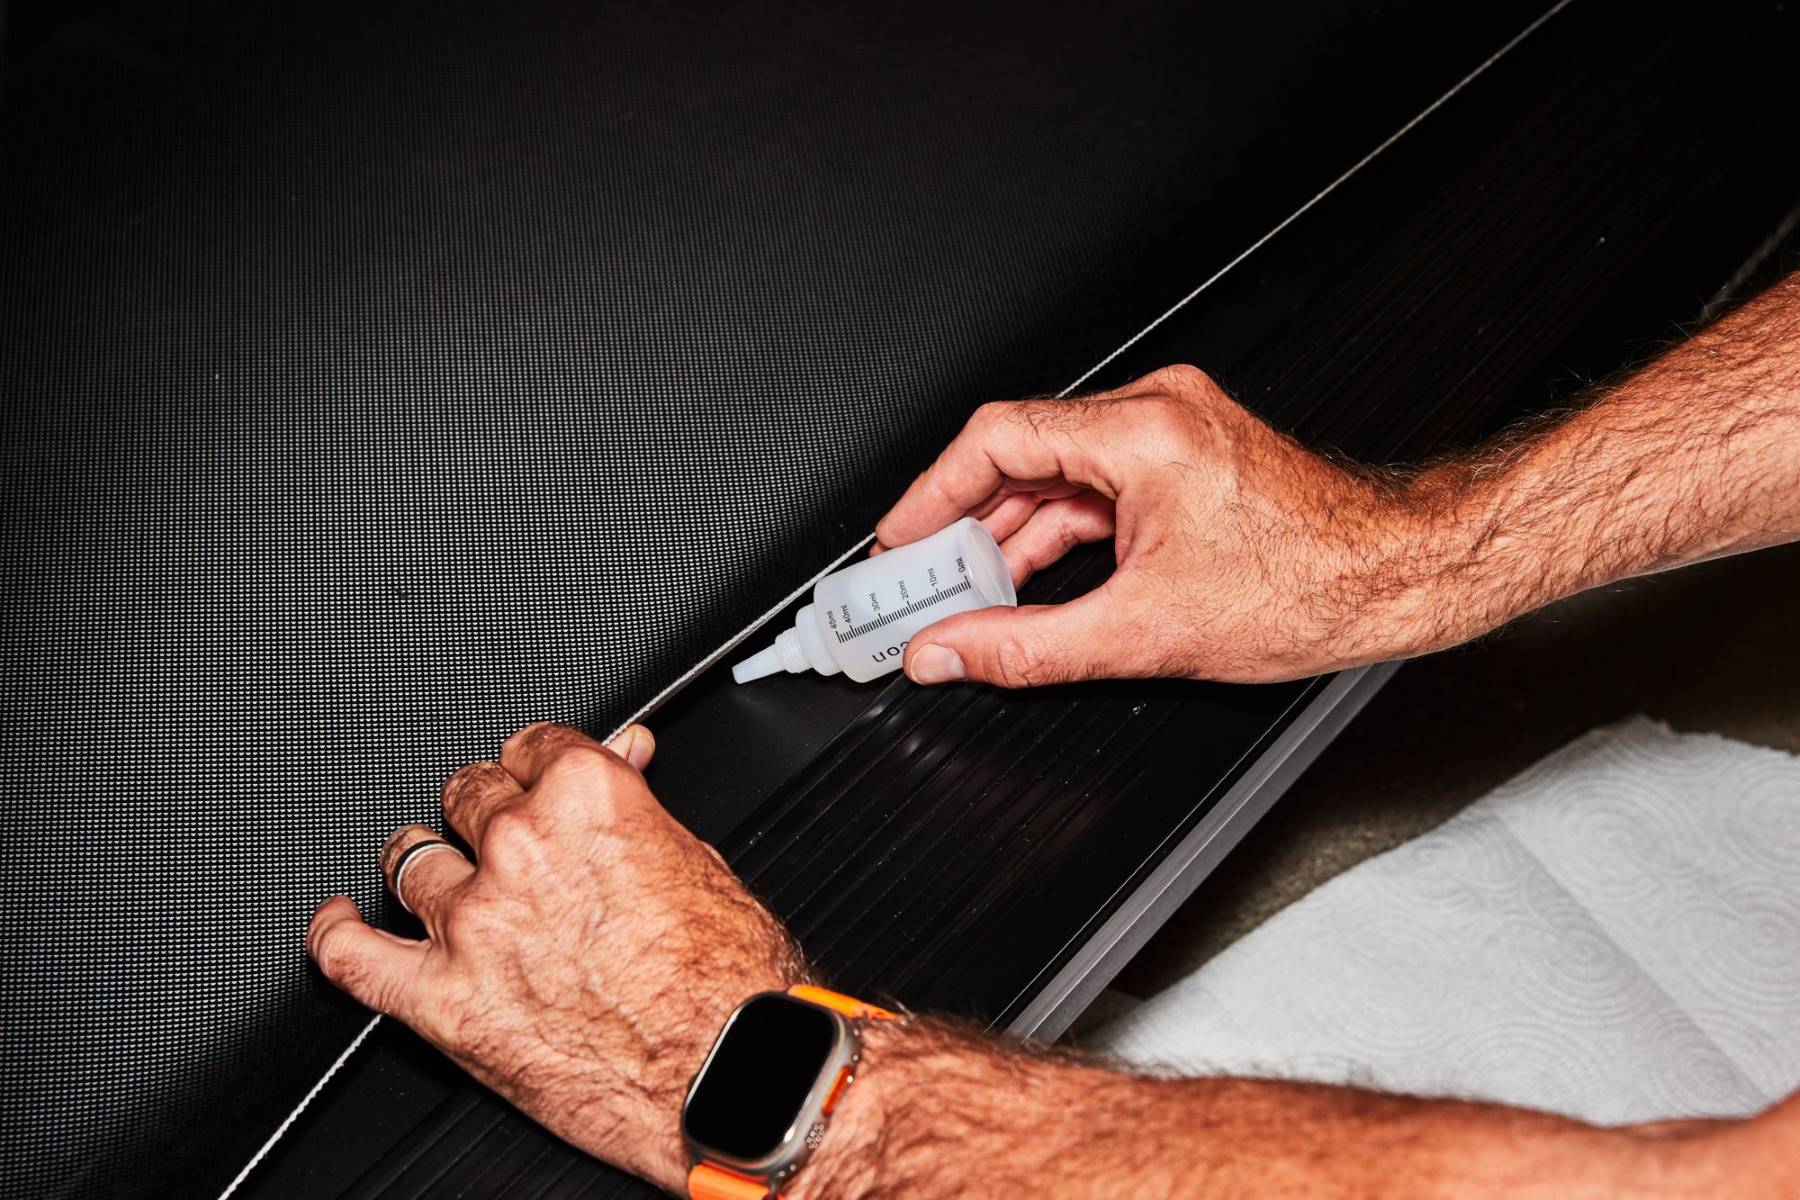
Now that you have prepared your treadmill, it’s time to apply the lubricant to the belt and deck. Follow these steps to ensure a proper application:
- Read the manufacturer’s instructions: Before applying the lubricant, refer to your treadmill’s manual or contact the manufacturer to understand the recommended quantity and application method. Different treadmill models may have specific instructions that you need to follow.
- Apply the lubricant: Using the provided applicator or a clean cloth, apply the lubricant to the underside of the treadmill belt. Start at the center of the belt and work your way towards the edges, ensuring an even coat. Avoid applying the lubricant on top of the belt or on the deck.
- Use the recommended quantity: Follow the manufacturer’s recommendations for the appropriate amount of lubricant to use. Applying too much lubricant can cause the belt to slip, while too little may not provide adequate lubrication. Strike a balance to maintain optimal performance.
- Apply to the entire belt: Make sure to apply the lubricant to the entire length of the treadmill belt. Pay extra attention to the middle of the belt, as this is where most of the friction occurs during your workout. Ensure that the lubricant is evenly distributed.
Take your time during this step to ensure that the lubricant is applied correctly. By following these steps, you’ll ensure that your treadmill is properly lubricated, minimizing friction and extending the lifespan of your machine.
Step 4: Distribute the lubricant evenly
After applying the lubricant to the treadmill belt, it’s crucial to distribute it evenly to ensure optimal performance. Follow these steps to achieve an even distribution of the lubricant:
- Walk on the treadmill: Step onto the treadmill and walk on it at a slow speed for a few minutes. This will help to evenly distribute the lubricant across the entire surface of the belt. The natural motion of your feet will aid in spreading the lubricant.
- Check for any excess lubricant: While walking on the treadmill, pay attention to any excess lubricant that may accumulate. If you notice any pooling or excessive lubricant, use a clean cloth to wipe it away. Too much lubricant can cause the belt to slip or slide, reducing its effectiveness.
- Listen for any unusual noise: As you walk on the treadmill, listen for any unusual sounds or squeaking. If you hear any noises, it could indicate that the lubricant is not evenly distributed. In such cases, pause the treadmill, and use a clean cloth to distribute the excess lubricant or apply more in areas that seem dry.
- Repeat if necessary: Depending on the condition of your treadmill, you may need to repeat the process of walking on the treadmill and checking for even distribution. This step ensures that all areas of the belt and deck are adequately lubricated.
By carefully distributing the lubricant, you’ll minimize friction, reduce noise, and achieve smooth and reliable treadmill performance.
Step 5: Test the treadmill
Once you have lubricated your treadmill and ensured even distribution, it’s time to test its performance. Testing the treadmill will help you verify if the lubrication process was successful and if any adjustments are needed. Follow these steps to effectively test your treadmill:
- Start at a low speed: Begin by setting your treadmill to a low speed. This will allow you to observe the performance of the belt and check if there are any issues such as slipping or unusual noise.
- Walk or run on the treadmill: Get onto the treadmill and walk or run on it for a few minutes. Pay attention to how smoothly the belt moves and if there are any changes in performance compared to before lubrication.
- Observe the belt alignment: While using the treadmill, observe the alignment of the belt. It should remain centered and not shift to one side. If you notice any misalignment, it may require readjustment or further lubrication.
- Listen for any noise: As you test the treadmill, listen carefully for any unusual or persistent noise. A properly lubricated treadmill should run smoothly and quietly. If you hear any squeaking or grinding sounds, it might indicate the need for additional lubrication or adjustments.
If you notice any issues during the testing phase, such as belt slipping, misalignment, or persistent noise, it may be necessary to make further adjustments or apply additional lubricant. Remember that regular testing and maintenance of your treadmill will ensure its optimal performance and longevity.
Step 6: Maintain regular lubrication schedule
Now that you have successfully lubricated your treadmill and tested its performance, it’s important to establish a regular lubrication schedule to keep your treadmill running smoothly. Regular lubrication is crucial for the longevity of your treadmill and to ensure a safe and comfortable workout experience. Here are some tips on maintaining a regular lubrication schedule:
- Refer to the manufacturer’s guidelines: Consult your treadmill’s manual or contact the manufacturer to determine the recommended lubrication frequency. Different treadmills may have varying schedules, so it’s essential to follow the specific guidelines for your model.
- Keep track of usage: Take note of how often and how intensively you use your treadmill. If you use it heavily or for extended periods, you may need to lubricate it more frequently. High-intensity workouts or increased usage can cause the lubricant to wear off faster.
- Inspect the treadmill regularly: Regularly check the treadmill belt and deck for any signs of wear or damage. If you notice any excessive friction, belt slippage, or unusual noises, it may be an indication that lubrication is needed.
- Clean the treadmill regularly: In addition to lubrication, it’s crucial to keep your treadmill clean. Regularly wipe down the belt and deck, remove any debris, and clean the motor housing to prevent any build-up that can affect the performance of the treadmill.
- Follow proper maintenance guidelines: Apart from lubrication, follow the manufacturer’s instructions for general maintenance of your treadmill. This may include belt tension adjustments, motor care, and overall cleaning.
By adhering to a regular lubrication schedule and proper maintenance, you’ll ensure the optimal performance and longevity of your treadmill. Regular lubrication not only reduces friction and noise but also prevents unnecessary strain on the motor, belt, and other components of the treadmill.
Conclusion
Properly lubricating your Sole Treadmill is a crucial part of its maintenance routine. By following the simple steps outlined in this article, you can ensure that your treadmill remains in optimal condition, providing you with a smooth and enjoyable workout experience.
Remember to gather all the necessary materials before starting the lubrication process. Preparing your treadmill by turning it off, elevating it, and cleaning the belt and deck sets the stage for a successful lubrication. Applying the lubricant evenly and distributing it across the entire belt guarantees optimal performance.
Once the lubrication process is complete, test your treadmill to ensure that it is running smoothly. Look out for any slipping, misalignment, or unusual noises. Adjustments can be made as needed to achieve the best performance.
Lastly, maintaining a regular lubrication schedule is key. Consult the manufacturer’s guidelines, keep track of usage, and inspect and clean your treadmill regularly. Proper maintenance will extend the lifespan of your treadmill and keep it operating at its best.
By taking the time to lubricate and maintain your treadmill, you are investing in its longevity and ensuring that it continues to support your fitness goals for years to come. Make lubrication a part of your regular treadmill maintenance routine, and you’ll enjoy a smooth and efficient workout every time.